


In the dynamic world of social media, Bluesky is carving out a niche with its innovative approach to content curation. With its unique "My Feeds" feature, Bluesky empowers users to customize their social media experience by choosing from a variety of feeds, each powered by a different algorithm.
Creating these diverse feeds, however, requires a Bluesky feed generator, a tool that necessitates some technical know-how. This is where AWS services come into the picture, simplifying the deployment and operation of a Bluesky feed generator.
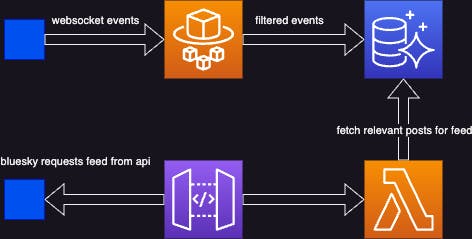
Our proposed architecture leverages AWS Fargate, AWS Lambda, and Aurora Serverless. AWS Fargate runs a container designed to parse the Bluesky event stream, capturing only the relevant data. This data is then stored in an Aurora Serverless database. AWS Lambda is employed to deliver the stream, working in tandem with AWS Fargate to reduce operational overhead and allow us to focus on core functionality. This combination also serves as our "feed algorithm".
Deploying the Bluesky feed generator as an AWS CDK project not only streamlines the process of feed creation but also democratizes it, making it accessible to a wider audience. It facilitates easy scaling of resources, and efficient cost management, and enables us to focus more on developing unique, user-centric feeds rather than managing the underlying infrastructure.
In the upcoming sections of this blog post, we'll delve deeper into the technical aspects of deploying a Bluesky feed generator using AWS services. We'll provide a step-by-step guide to help you get started, including creating a feed of "skeets" from AWS Employees, AWS Heroes, and AWS Community Builders.
PSST... feel free to follow me on Bluesky too
The Bluesky-provided Feed Generator
Bluesky provides a basic feed generator on their GitHub, but it's a bit like having a camera without the right settings - it lacks the necessary architecture to capture the perfect shot.
At its heart, the service provided by Bluesky's repo performs three key functions:
It latches onto the Bluesky Websocket stream and filters events into a database. It's like adjusting the focus on your camera, ensuring only the relevant subjects are in clear view 1.
It features a feed endpoint that cherry-picks relevant rows from the database. Think of it as the photographer, selecting the best shots for the final album 2.
It includes a static endpoint that "registers" the feed. This is like the metadata of a photo, providing all the necessary information about the shot 3.
To register the feed service, a script is run that's a bit like the final editing process before the photos are published. It connects to Bluesky and registers the feed name and service URL, making sure everything is picture-perfect 4.
Now, here's where we bring in the big guns - AWS CDK. We're going to give this feed generator a major upgrade.
Firstly, we'll move the WebSocket stream connection to a Fargate service. This is akin to upgrading from a manual focus to an automatic one - it's faster, more efficient, and doesn't require as much manual effort.
Next, we'll transform the feed endpoint into an AWS Lambda function. This is like having an automated photo editor - it's more efficient, scalable, and doesn't require constant supervision.
The static endpoint will be relocated to a simple MockIntegration in the APIGateway. This is like moving your photo metadata management to a digital platform - it's more efficient, reliable, and easily accessible.
Lastly, we'll shift the feed registration script to be run by a CustomResource-invoked Lambda. This is like automating your final photo editing process - it's more reliable, efficient, and doesn't require constant attention.
In essence, we're taking the basic structure provided by Bluesky and supercharging it with the power of AWS CDK.
Crafting The Bluesky Database
First up on our agenda is the creation of the database that will serve as the meeting point for our parser and feed. This setup bears a resemblance to my recent post about Creating an Aurora MySQL Database and Setting Up a Kinesis CDC Stream with AWS CDK. However, there's a twist - we won't be needing the stream this time, and we'll be employing Aurora Serverless instead.
Our game plan involves crafting a CDK Construct that houses the database and a CustomResource-invoked Lambda that will lay the groundwork for the database schema. Let's dive into the creation of the database:
this.db = new ServerlessCluster(this, 'cluster', {
  clusterIdentifier: `bluesky`,
  credentials: Credentials.fromGeneratedSecret('admin'),
  defaultDatabaseName: dbName,
  engine: DatabaseClusterEngine.AURORA_MYSQL,
  removalPolicy: RemovalPolicy.DESTROY,
  enableDataApi: true,
  vpc,
});
Next, we'll whip up the lambda function and the custom resource:
const dbInitFn = new NodejsFunction(this, "dbInitFn", {
  functionName: "bluesky-db-init",
  entry: join(__dirname, "lambda/db-init.ts"),
  runtime: Runtime.NODEJS_18_X,
  timeout: Duration.minutes(15),
  tracing: Tracing.ACTIVE,
  environment: {
    DB_NAME: dbName,
    CLUSTER_ARN: this.db.clusterArn,
    SECRET_ARN: this.db.secret?.secretArn || '',
  },
});
this.db.grantDataApiAccess(dbInitFn);

const initProvider = new Provider(this, `init-db-provider`, {
  onEventHandler: dbInitFn,
});

new CustomResource(this, `init-db-resource`, {
  serviceToken: initProvider.serviceToken,
});
Our lambda's handler will be interacting with the database using the RDS Data API, taking advantage of the secrets that CloudFormation has created for the database:
if (event.RequestType === "Create") {
    await client.send(cmd(`select 1`));
    console.log("db-init: create tables");
    await client.send(
      cmd(
        `CREATE TABLE IF NOT EXISTS post (uri VARCHAR(255) NOT NULL, cid VARCHAR(255) NOT NULL, author VARCHAR(255) NOT NULL, replyParent VARCHAR(255), replyRoot VARCHAR(255), indexedAt DATETIME NOT NULL, PRIMARY KEY (uri));`
      )
    );
    console.log("created post table");
    await client.send(cmd(`CREATE TABLE IF NOT EXISTS sub_state (service VARCHAR(255) NOT NULL, cursor_value INT NOT NULL, PRIMARY KEY (service));`))
    console.log("created sub_state table");
}
Since we want the tables to be created only when the stack is first deployed, we filter on event.RequestType === "Create". However, to err on the side of caution, we've also included IF NOT EXISTS in the SQL commands. Better safe than sorry!
Constructing the Parser: Connecting to the Bluesky Event Stream
In the next phase of our process, we're going to construct the parser that connects to the Bluesky event stream. This component is the linchpin that connects us to the publicly available Bluesky web socket event stream. It's like the lens of our camera, capturing the events that we're interested in and focusing them into a coherent image.
Let's dive into the code and understand the key parts:
const cluster = new Cluster(this, "bluesky-feed-generator-cluster", {
  vpc,
  enableFargateCapacityProviders: true,
});
Here, we're setting up our Fargate cluster. This is akin to positioning our camera on a tripod, providing a stable platform for our operations.
const taskDefinition = new FargateTaskDefinition(
  this,
  "bluesky-feed-generator-task",
  {
    runtimePlatform: {
      cpuArchitecture: CpuArchitecture.ARM64,
    },
    memoryLimitMiB: 1024,
    cpu: 512,
  }
);
db.grantDataApiAccess(taskDefinition.taskRole);
Next, we're defining a Fargate task. This is like adjusting the camera's settings, such as aperture and shutter speed, to ensure we capture the best possible shot. We're also granting this task access to our database, much like giving our camera the ability to store the photos it captures.
const logging = new AwsLogDriver({
  logRetention: RetentionDays.ONE_DAY,
  streamPrefix: "bluesky-feed-generator",
});
We're setting up a log driver here, which is akin to the camera's viewfinder, allowing us to monitor and review our operations.
taskDefinition.addContainer("bluesky-feed-parser", {
  logging,
  image: ContainerImage.fromDockerImageAsset(
    new DockerImageAsset(this, "bluesky-feed-parser-img", {
      directory: join(__dirname, ".."),
      platform: Platform.LINUX_ARM64,
    })
  ),
  environment: {
    DB_NAME: dbName,
    CLUSTER_ARN: db.clusterArn,
    SECRET_ARN: db.secret?.secretArn || '',
  }
});
Here, we're adding a container to our task definition. This is like attaching a lens to our camera, defining what it will capture. We're also specifying the environment variables, which are akin to the camera's internal settings.
new FargateService(this, "bluesky-feed-generator", {
  cluster,
  taskDefinition,
  enableExecuteCommand: true,
  // fargate service needs to select subnets with the NAT in order to access AWS services
  vpcSubnets: {
    subnetType: SubnetType.PRIVATE_WITH_EGRESS,
  },
  securityGroups: [securityGroup]
});
Finally, we're creating a new Fargate service, which is like pressing the camera's shutter button, setting everything into motion. We're specifying that the service should be able to execute commands and that it should select subnets with NAT to access AWS services, ensuring our camera can communicate with the outside world.
The Service Code
The code for our Fargate Service is heavily inspired by the feed generator provided by Bluesky. However, we've stripped out all the unnecessary parts (like express, etc). All we need to do is connect to the WebSocket stream and save relevant events to the already-created database.
When we created the DockerImageAsset above, we pointed it to our root directory which contains a Dockerfile. This Dockerfile installs the dependencies and runs the app which creates a FirehoseSubscription.
for (const post of ops.posts.creates) {
  if (awsCommunityDids.includes(post.author)) {
    const user = awsCommunityDidsToKeys[post.author];
    console.log(`${user} posted ${post.record.text}`);
    postsToCreate.push({
      uri: post.uri,
      cid: post.cid,
      author: user,
      replyParent: post.record?.reply?.parent.uri ?? null,
      replyRoot: post.record?.reply?.root.uri ?? null,
      indexedAt: new Date().toISOString().slice(0, 19).replace("T", " "),
    });
  }
}

if (postsToCreate.length > 0) {
  console.log(JSON.stringify({ postsToCreate }));
  const insertSql = `INSERT INTO post (uri, cid, author, replyParent, replyRoot, indexedAt) VALUES ${postsToCreate
    .map(
      () => "(:uri, :cid, :author, :replyParent, :replyRoot, :indexedAt)"
    )
    .join(", ")} ON DUPLICATE KEY UPDATE uri = uri`;

  const insertParams = postsToCreate.flatMap((post) => [
    { name: "uri", value: { stringValue: post.uri } },
    { name: "cid", value: { stringValue: post.cid } },
    { name: "author", value: { stringValue: post.author } },
    {
      name: "replyParent",
      value: post.replyParent
        ? { stringValue: post.replyParent }
        : { isNull: true },
    },
    {
      name: "replyRoot",
      value: post.replyRoot
        ? { stringValue: post.replyRoot }
        : { isNull: true },
    },
    { name: "indexedAt", value: { stringValue: post.indexedAt } },
  ]);

  const insertCmd = cmd(insertSql, insertParams);
  await client.send(insertCmd);
  console.log(`Created ${postsToCreate.length} posts`);
}
This is akin to the post-processing phase in photography. We're selecting the best shots (or in this case, posts) based on our predefined criteria, and storing them in our database. We're also ensuring that we handle deletions appropriately, keeping our collection of shots up-to-date.
The Bluesky Feed
The final CDK Construct creates an API Gateway with two endpoints, and the CustomResource that registers the feed.
Creating the Feed
This section of the code is primarily concerned with setting up the API Gateway and the DNS records for the service. Here are the key parts:
const hostedzone = HostedZone.fromLookup(this, "hostedzone", {
  domainName: zoneDomain,
});
const certificate = new Certificate(this, "certificate", {
  domainName,
  validation: CertificateValidation.fromDns(hostedzone),
});
Here, we're looking up the hosted zone for our domain and creating a certificate for it. This is like setting up the address and credentials for our online photo gallery.
const api = new RestApi(this, "RestApi", {
  defaultMethodOptions: {
    methodResponses: [{ statusCode: "200" }],
  },
  deployOptions: {
    tracingEnabled: true,
    metricsEnabled: true,
    dataTraceEnabled: true,
  },
  endpointConfiguration: {
    types: [EndpointType.REGIONAL],
  },
});
Next, we're setting up the REST API. This is like setting up the interface for our online gallery, defining how users will interact with it.
Of course, let's not forget the MockIntegration:
const didIntegration = new MockIntegration(didOptions);
const didResource = api.root
  .addResource(".well-known")
  .addResource("did.json");
didResource.addMethod("GET", didIntegration, {
  methodResponses: [
    {
    statusCode: "200",
    },
  ],
});
Here, we're setting up a MockIntegration. In the context of AWS API Gateway, a MockIntegration is a type of integration that allows you to simulate API behavior without implementing any backend logic. It's like a placeholder or a dummy that returns pre-configured responses to requests.
In this case, we're using it to serve a static JSON response for the did.json endpoint under the .well-known path. This endpoint is typically used to provide a standard way to discover information about the domain, and in this case, it's providing information about the Bluesky feed generator service.
This is akin to having a static information page in our photo gallery that provides details about the gallery itself. It doesn't change or interact with the visitor but provides essential information for anyone who asks.
const feedFn = new NodejsFunction(this, "feed", {
  functionName: "bluesky-feed",
  entry: join(__dirname, "lambda/feed.ts"),
  runtime: Runtime.NODEJS_18_X,
  timeout: Duration.seconds(30),
  tracing: Tracing.ACTIVE,
  environment: {
    DB_NAME: dbName,
    CLUSTER_ARN: db.clusterArn,
    SECRET_ARN: db.secret?.secretArn || "",
  },
});
db.grantDataApiAccess(feedFn);
Here, we're defining a new Node.js function that will serve as the feed for our service. This is like setting up the mechanism that will display the photos in our gallery.
api.root
  .addResource("xrpc")
  .addResource("app.bsky.feed.getFeedSkeleton")
  .addMethod("GET", feedIntegration);
This is where we're defining the endpoint for our feed. This is like setting up the URL where users can view our photo gallery.
api.addDomainName(`Domain`, {
  domainName,
  certificate,
  securityPolicy: SecurityPolicy.TLS_1_2,
});
new ARecord(scope, `ARecord`, {
  zone: hostedzone,
  recordName: domainName,
  target: RecordTarget.fromAlias(new ApiGateway(api)),
});
Finally, we're associating our domain name with our API and creating an A record for it. This is like linking our online gallery to our chosen web address, making it accessible to the public.
Registering the feed
We create another lambda and custom resource with:
const publishSecret = Secret.fromSecretCompleteArn(this, "publish-secret", props.publishFeed.blueskySecretArn);
const publishFeedFn = new NodejsFunction(this, "publish-feed", {
  functionName: "bluesky-publish-feed",
  entry: join(__dirname, "lambda/publish-feed.ts"),
  runtime: Runtime.NODEJS_18_X,
  timeout: Duration.seconds(30),
  tracing: Tracing.ACTIVE,
  environment: {
    HANDLE: props.publishFeed.handle,
    SECRET_ARN: props.publishFeed.blueskySecretArn,
    FEEDGEN_HOSTNAME: domainName,
    FEEDS: JSON.stringify(props.publishFeed.feeds),
  },
});
publishSecret.grantRead(publishFeedFn);

const publishProvider = new Provider(this, `publish-feed-provider`, {
  onEventHandler: publishFeedFn,
});

new CustomResource(this, `publish-feed-resource`, {
  serviceToken: publishProvider.serviceToken,
  properties: {
    Version: `${Date.now()}`,
  },
});
Here we make sure that it has access to our Bluesky App password (created on our Bluesky account's settings page).
The handler code follows the same process as Bluesky's own publishFeedGen.ts script, except we get the password from the secrets manager first. This code runs with every deployment and supports registering multiple feeds pointing at the same lambda.
Tying It All Together: Deploying the Stack
Having created the individual constructs, we now need to assemble them into a cohesive stack. This is akin to putting together our camera, lens, and tripod into a complete photography setup.
const vpc = new Vpc(this, "vpc");
const securityGroup = new SecurityGroup(this, "security-group", {
  vpc,
  allowAllOutbound: true,
});

const dbName = 'bluesky';
const { db } = new BlueskyDb(this, 'bluesky-db', {
  dbName,
  vpc,
});

const domainName = 'martz.codes';

new BlueskyParser(this, 'bluesky-parser', {
  db,
  dbName,
  securityGroup,
  vpc,
});

new BlueskyFeed(this, 'bluesky-feed', {
  db,
  dbName,
  domainName,
  publishFeed,
});
In the code above, we're first setting up a Virtual Private Cloud (VPC) and a security group. This is like choosing a location for our photo shoot and setting up the necessary security measures.
Next, we're creating our Bluesky database within this VPC. This is akin to setting up our storage system for the photos we'll capture.
We then instantiate our Bluesky parser and feed constructs, passing in the necessary parameters such as the database, domain name, and security group. This is like setting up our camera and lens, ready to start capturing photos.
In the bin file, we include the required publishFeed properties:
publishFeed: {
    handle: 'martz.codes',
    blueskySecretArn: "arn:aws:secretsmanager:us-east-1:359317520455:secret:bluesky-rQXJxQ",
    feeds: {
      "aws-community": {
        displayName: "AWS Community",
        description: "This is a test feed served from an AWS Lambda. It is a list of AWS Employees, AWS Heroes and AWS Community Builders",
      }
    },
  },
This is like setting up the details of our photo gallery, including the name, description, and access credentials.
It's worth noting that this stack was built iteratively. While it should work as expected, there may be a missing dependency that could affect the deployment order for the CustomResources.
Once deployed, we can visit the feed's page on Bluesky: https://bsky.app/profile/did:plc:a62mzn6xxxxwktpdprw2lvnc/feed/aws-community
The URL structure is as follows: https://bsky.app/profile/<owner's DID>/feed/<short-name>. When this URL is loaded in Bluesky, the Bluesky service makes a call to the feed URL. The feed then replies with several DIDs of posts, which the Bluesky service hydrates. This is like visiting our online photo gallery, where the service fetches and displays the photos based on the visitor's request.
Conclusion
And there you have it! We've walked through the process of deploying a Bluesky feed generator using AWS services, specifically AWS CDK, Fargate, Lambda, and Aurora Serverless. This setup allows us to parse the Bluesky event stream, store relevant events in a database, and serve the feed using a serverless architecture. It's like setting up a fully automated photography studio that captures, stores, and displays photos based on specific criteria.
But this is just the beginning. There are countless ways you could expand on this setup to suit your specific needs or explore new possibilities. Here are a few ideas to get you started:
Customize Your Feed Algorithm: The feed algorithm we used in this example is relatively simple, focusing on posts from specific authors. You could expand on this by incorporating more complex criteria, such as keywords, hashtags, or even sentiment analysis. This would be like using advanced filters or editing techniques to select and enhance your photos.
Integrate with Other Services: You could integrate your feed generator with other AWS services or third-party APIs to add more functionality. For example, you could use AWS Comprehend to analyze the sentiment of posts, AWS Translate to support multiple languages, or AWS SNS to send notifications when new posts are added to the feed.
Create a User Interface: While Bluesky provides a platform to view the feeds, you could also create your own user interface to display the feeds in a unique way. This could be a web app, a mobile app, or even an Alexa skill. This would be like creating your own online gallery or photo app to showcase your photos.
Scale Up: Our setup is designed to be scalable, but you could take this further by implementing more advanced scaling strategies. For example, you could use AWS Auto Scaling to automatically adjust the capacity of your Fargate service based on demand, or AWS ElastiCache to improve the performance of your database.
Secure Your Setup: While we've implemented basic security measures, there's always more you can do to protect your data and your users. You could use AWS Shield for DDoS protection, AWS WAF for web application firewall, or AWS Macie to discover, classify, and protect sensitive data.
Remember, the sky's the limit when it comes to what you can achieve with AWS services and Bluesky. So don't be afraid to experiment, innovate, and create something truly unique.