


Photo by Benjamin Davies on Unsplash
Creating an Aurora MySQL Database and Setting Up a Kinesis CDC Stream with AWS CDK


Welcome to this comprehensive guide where we will be using the AWS Cloud Development Kit (CDK) to create an Aurora MySQL Database, initialize it using Custom Resources, and set up a Change Data Capture (CDC) Stream with Amazon Data Migration Service (DMS) and Kinesis.
This post builds upon the concepts introduced in How to Use BinLogs to Make an Aurora MySQL Event Stream. Instead of relying on a lambda to parse the BinLog periodically, we'll be leveraging the capabilities of AWS DMS. The future integration of Serverless DMS with CloudFormation promises to further enhance this system.
You can find the code for this project on GitHub.
To ensure clarity and organization, our project will be structured into two separate stacks: the DatabaseStack and the DMS Stack. The DatabaseStack includes the VPC, the Aurora MySQL database, and the lambdas responsible for initializing and seeding the database. The DMS Stack encompasses DMS, the CustomResources that manage the DMS Replication Task, and the target Kinesis Stream.
This division allows us to accommodate those who already have a VPC and Aurora MySQL database in place. If you fall into this category, you can easily integrate your existing resources into the DMS stack.
Step 1: Creating the VPC and Aurora MySQL Database
Our first step is to create the DatabaseStack, which involves setting up the Aurora MySQL database and the VPC. You can find the code for this step here.
When creating the VPC, it's crucial to ensure that it includes a NAT Gateway. This gateway allows instances in a private subnet to connect to the internet or other AWS Services while preventing inbound connections from the internet. This is essential because our resources within the VPC need to communicate with AWS Services. Fortunately, VPCs are equipped with a NAT Gateway by default.
const vpc = new Vpc(this, "vpc", {
  maxAzs: 2,
});
Next, we create the database cluster using the appropriate code.
const db = new DatabaseCluster(this, "db", {
  clusterIdentifier: `db`,
  credentials: Credentials.fromGeneratedSecret("admin"),
  defaultDatabaseName: dbName,
  engine: DatabaseClusterEngine.auroraMysql({
    version: AuroraMysqlEngineVersion.VER_3_03_0,
  }),
  iamAuthentication: true,
  instanceProps: {
    instanceType: InstanceType.of(InstanceClass.T4G, InstanceSize.MEDIUM),
    vpc,
    vpcSubnets: {
      onePerAz: true,
    },
  },
  removalPolicy: RemovalPolicy.DESTROY,
  parameters: {
    binlog_format: "ROW",
    log_bin_trust_function_creators: "1",
    // https://aws.amazon.com/blogs/database/introducing-amazon-aurora-mysql-enhanced-binary-log-binlog/
    aurora_enhanced_binlog: "1",
    binlog_backup: "0",
    binlog_replication_globaldb: "0"
  },
});
db.connections.allowDefaultPortInternally();
Now that the database is created, we need to initialize the schema. We achieve this by utilizing a CustomResource, which triggers actions during a CloudFormation stack deployment. In our case, we'll trigger a lambda function that connects to the database and creates a table. This CustomResource can also be used to create users or seed the database with data, but for now, we'll focus on creating an empty table.
The first step in this process is to create the lambda. We ensure that the lambda has access to the database's secret (which is automatically created) with db.secret?.grantRead(initFn). This secret contains the credentials that the lambda needs to connect to the database.
const initFn = new NodejsFunction(this, `db-init`, {
  ...lambdaProps,
  entry: join(__dirname, "lambda/db-init.ts"),
  environment: {
    SECRET_ARN: secret.secretArn,
    DB_NAME: dbName,
    TABLE_NAME: tableName,
  },
  vpc,
  vpcSubnets: {
    onePerAz: true,
  },
  securityGroups: db.connections.securityGroups,
});
db.secret?.grantRead(initFn);
initFn.node.addDependency(db);
The lambda handler code is responsible for creating the table, and we ensure that this action is carried out when the stack is created:
import type {
  CloudFormationCustomResourceEvent,
  CloudFormationCustomResourceFailedResponse,
  CloudFormationCustomResourceSuccessResponse,
} from 'aws-lambda';

import { getConnectionPool } from './utils/connection';

export const handler = async (
  event: CloudFormationCustomResourceEvent,
): Promise<CloudFormationCustomResourceSuccessResponse | CloudFormationCustomResourceFailedResponse> => {
  switch (event.RequestType) {
    case 'Create':
      try {
        const connection = await getConnectionPool();

        await connection.query(
          "CALL mysql.rds_set_configuration('binlog retention hours', 24);"
        );

        await connection.query(`DROP TABLE IF EXISTS ${process.env.DB_NAME}.${process.env.TABLE_NAME};`);
        await connection.query(`CREATE TABLE ${process.env.DB_NAME}.${process.env.TABLE_NAME} (id INT NOT NULL AUTO_INCREMENT, example VARCHAR(255) NOT NULL, PRIMARY KEY (id));`);

        return { ...event, PhysicalResourceId: `init-db`, Status: 'SUCCESS' };
      } catch (e) {
        console.error(`initialization failed!`, e);
        return { ...event, PhysicalResourceId: `init-db`, Reason: (e as Error).message, Status: 'FAILED' };
      }
    default:
      console.error('No op for', event.RequestType);
      return { ...event, PhysicalResourceId: 'init-db', Status: 'SUCCESS' };
  }
};
To ensure that the lambda is invoked as part of the stack deployment, we create a provider for the lambda and a CustomResource. The provider specifies the lambda to be invoked, and the CustomResource triggers the invocation when the stack is deployed. This ensures that the database initialization is fully integrated into the stack deployment process.
const initProvider = new Provider(this, `init-db-provider`, {
  onEventHandler: initFn,
});

new CustomResource(this, `init-db-resource`, {
  serviceToken: initProvider.serviceToken,
});
Step 2: Understanding CloudFormation and DMS Streams
DMS Change Data Capture replication relies on MySQL's Binlog. To enable DMS, binlog must be enabled in MySQL. When creating the database in the previous step, we included parameters that enable Aurora's enhanced binlog for improved performance. More information about this feature can be found here.
binlog_format: "ROW",
log_bin_trust_function_creators: "1",
aurora_enhanced_binlog: "1",
binlog_backup: "0",
binlog_replication_globaldb: "0"
Moving on, we can now create the stack that contains the DMS Replication Task and Kinesis stream. You can access the relevant code here.
First, we create the Kinesis stream that will serve as the target for the events.
const dbStream = new Stream(this, `db-stream`, {
  streamName: `db-stream`,
  streamMode: StreamMode.ON_DEMAND,
});
DMS requires a role called dms-vpc-role to function correctly, but it doesn't have the necessary permissions by default. Therefore, we need to manually create this role.
const dmsRole = new Role(this, `dms-role`, {
  roleName: `dms-vpc-role`, // need the name for this one
  assumedBy: new ServicePrincipal("dms.amazonaws.com"),
});
dmsRole.addManagedPolicy(
  ManagedPolicy.fromManagedPolicyArn(this, `AmazonDMSVPCManagementRole`, `arn:aws:iam::aws:policy/service-role/AmazonDMSVPCManagementRole`)
);
Next, we create the Replication Subnet Group that DMS will use to connect to the database. Since it would attempt to create the dms-vpc-role with the wrong permissions, we need to ensure that it uses the existing role we created. This requires adding a dependency between the two resources.
const dmsSubnet = new CfnReplicationSubnetGroup(this, `dms-subnet`, {
  replicationSubnetGroupDescription: "DMS Subnet",
  subnetIds: vpc.selectSubnets({
    onePerAz: true,
  }).subnetIds,
});
dmsSubnet.node.addDependency(dmsRole);
Now we can create the replication instance itself, utilizing the subnet we just created. For simplicity, we are using the smallest instance class, although ideally, we would support using Serverless DMS. Unfortunately, CloudFormation does not yet provide support for this.
const dmsRep = new CfnReplicationInstance(this, `dms-replication`, {
  replicationInstanceClass: "dms.t2.micro",
  multiAz: false,
  publiclyAccessible: false,
  replicationSubnetGroupIdentifier: dmsSubnet.ref,
  vpcSecurityGroupIds: securityGroups.map(
    (sg) => sg.securityGroupId
  ),
});
To enable DMS to connect to Aurora, we need to grant it access to the role created by the database. We accomplish this by manually creating a Role, granting it permission to read the database's secret, and providing it as the source endpoint for DMS.
const dmsSecretRole = new Role(this, `dms-secret-role`, {
  assumedBy: new ServicePrincipal(
    `dms.${Stack.of(this).region}.amazonaws.com`
  ),
});
secret.grantRead(dmsSecretRole);

const source = new CfnEndpoint(this, `dms-source-endpoint`, {
  endpointType: "source",
  engineName: "aurora",
  mySqlSettings: {
    secretsManagerAccessRoleArn: dmsSecretRole.roleArn,
    secretsManagerSecretId: secret.secretName,
  },
});
Since our target is Kinesis, we also need to create a "target" endpoint and assign a role that has access to put records on the Kinesis stream.
const streamWriterRole = new Role(this, `dms-stream-role`, {
  assumedBy: new ServicePrincipal(
    `dms.${Stack.of(this).region}.amazonaws.com`
  ),
});

streamWriterRole.addToPolicy(
  new PolicyStatement({
    resources: [dbStream.streamArn],
    actions: [
      "kinesis:DescribeStream",
      "kinesis:PutRecord",
      "kinesis:PutRecords",
    ],
  })
);

const target = new CfnEndpoint(this, `dms-target-endpoint`, {
  endpointType: "target",
  engineName: "kinesis",
  kinesisSettings: {
    messageFormat: "JSON",
    streamArn: dbStream.streamArn,
    serviceAccessRoleArn: streamWriterRole.roleArn,
  },
});
Finally, we create the replication task itself. We provide a generic table mapping that emits events for changes to any table. It's worth noting that wildcards can be used to restrict the mapping to specific tables if desired. For more information about table mappings take a look at the docs
const dmsTableMappings = {
  rules: [
    {
      "rule-type": "selection",
      "rule-id": "1",
      "rule-name": "1",
      "object-locator": {
        "schema-name": dbName,
        "table-name": "%",
        "table-type": "table",
      },
      "rule-action": "include",
      filters: [],
    },
  ],
};
const task = new CfnReplicationTask(this, `dms-stream-rep`, {
  replicationInstanceArn: dmsRep.ref,
  migrationType: "cdc",
  sourceEndpointArn: source.ref,
  targetEndpointArn: target.ref,
  tableMappings: JSON.stringify(dmsTableMappings),
  replicationTaskSettings: JSON.stringify({
    BeforeImageSettings: {
      EnableBeforeImage: true,
      FieldName: "before",
      ColumnFilter: "all",
    }
  }),
});
Additionally, we provide BeforeImageSettings in the replicationTaskSettings, which enables us to include a before image for row updates, allowing us to infer deltas on table row updates. For Change Data Capture, we are using the migration type cdc since we are not migrating existing data.
Important Considerations for CloudFormation and DMS
CloudFormation can NOT update DMS tasks that are actively running. It also does not automatically start a DMS Replication Task as part of the deployment. In order to get around this we'll set up some CustomResources and enforce their order that one will run before DMS changes, and one will run after.
The "pre" lambda will check if there are changes to DMS in the CloudFormation change set, if there are it will check if DMS is running, and if it is it will stop the task. It will also wait for the task to finish stopping before responding.
const StackName = `${process.env.STACK_NAME}`;
if (!ReplicationTaskArn) {
  ReplicationTaskArn = await getDmsTask({ cf, StackName });
}
const status = await getDmsStatus({ dms, ReplicationTaskArn });
if (status === 'running') {
  if (event.RequestType === 'Delete' || await hasDmsChanges({ cf, StackName })) {
    // pause task
    const stopCmd = new StopReplicationTaskCommand({
      ReplicationTaskArn,
    });
    await dms.send(stopCmd);
    // wait for task to be fully paused
    await waitForDmsStatus({ dms, ReplicationTaskArn, targetStatus: 'stopped' });
  }
}
On the other end, the "post" lambda will do the opposite. It will start (or resume) the DMS replication and wait for it to finish spinning up.
  const startCmd = new StartReplicationTaskCommand({
    ReplicationTaskArn,
    StartReplicationTaskType: "resume-processing",
  });
  await dms.send(startCmd);
  await waitForDmsStatus({
    dms,
    ReplicationTaskArn,
    targetStatus: "running",
  });
Additionally, we set up a lambda function that is invoked by the Kinesis stream. We add the stream as an event source for this lambda function.
const kinesisFn = new NodejsFunction(this, `stream-kinesis`, {
  ...lambdaProps,
  entry: join(__dirname, "lambda/stream-subscriber.ts"),
  tracing: Tracing.ACTIVE,
});

kinesisFn.addEventSource(
  new KinesisEventSource(dbStream, {
    batchSize: 100, // default
    startingPosition: StartingPosition.LATEST,
    filters: [
      { pattern: JSON.stringify({ partitionKey: [`${dbName}.${tableName}`] }) },
    ],
  })
);
Step 3: Testing the Event Stream
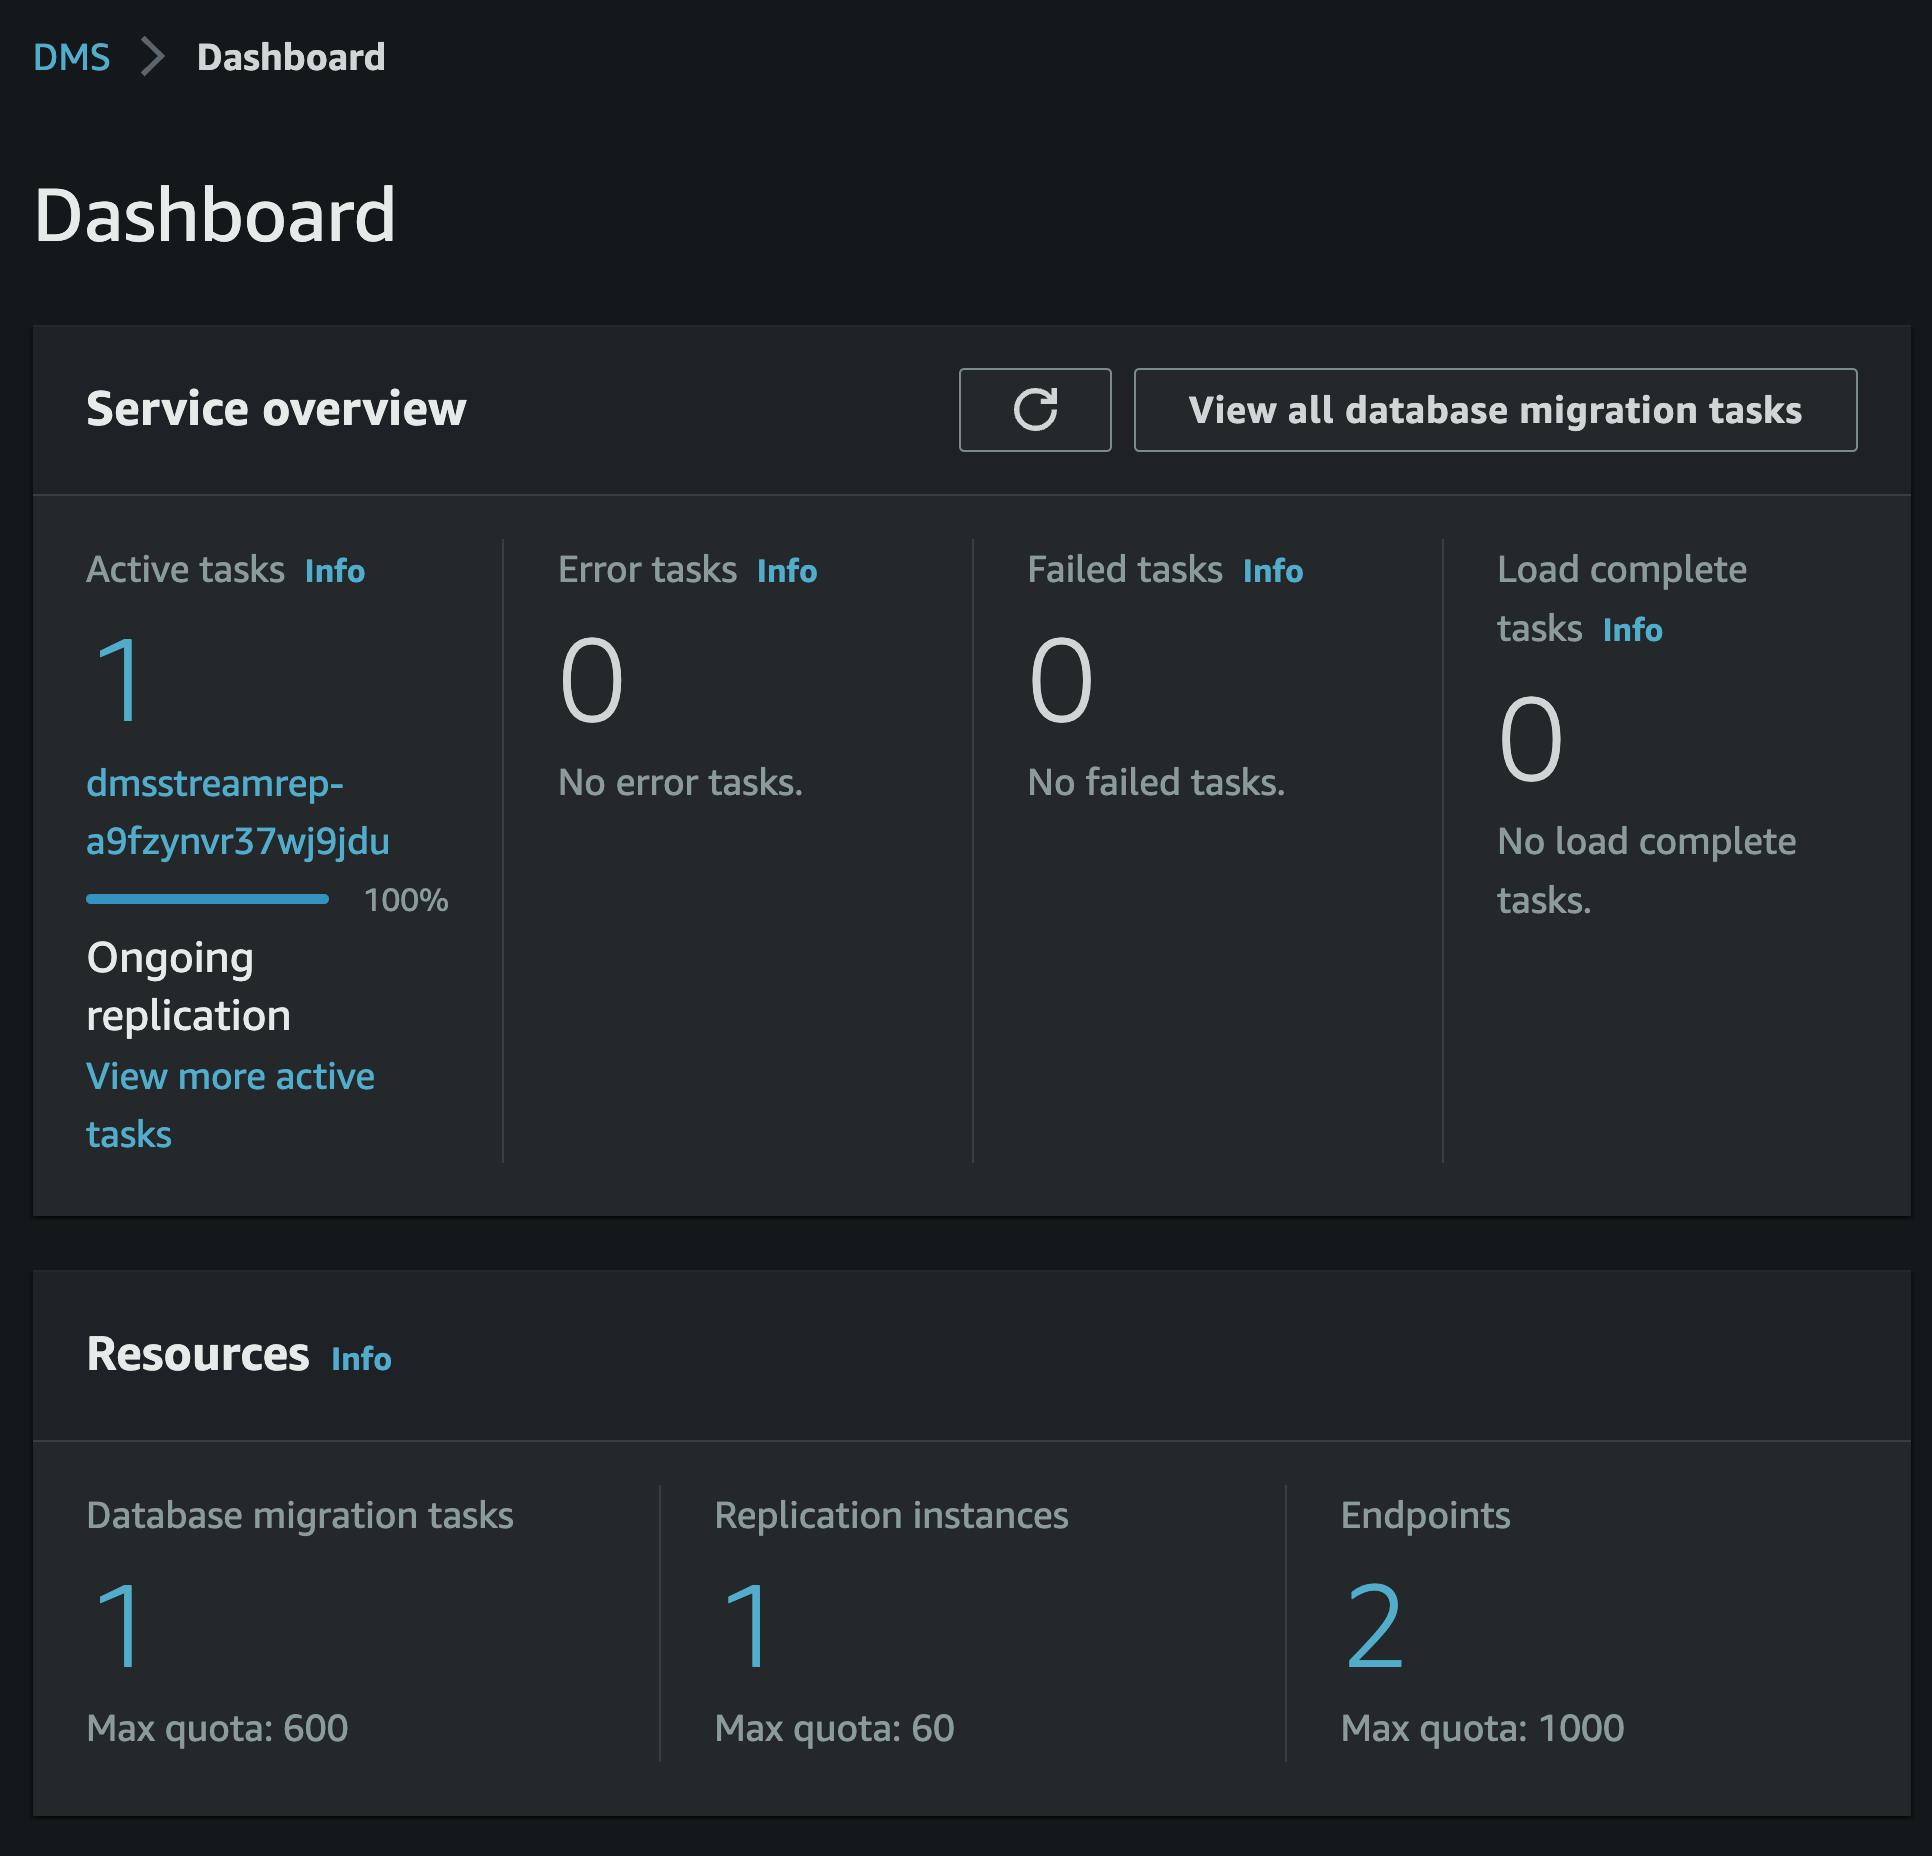
With both stacks deployed, we can now test DMS. To facilitate this process, a lambda function has been created, and its code can be accessed here. You can invoke this function using test events via the AWS console.
By logging in to the DMS console, we can observe that the replication task is already running, thanks to the CustomResources.
To view the table statistics for the task, we can see that our schema has been identified. If there were additional tables, they would also be listed here, but in our case, we only have the examples table.
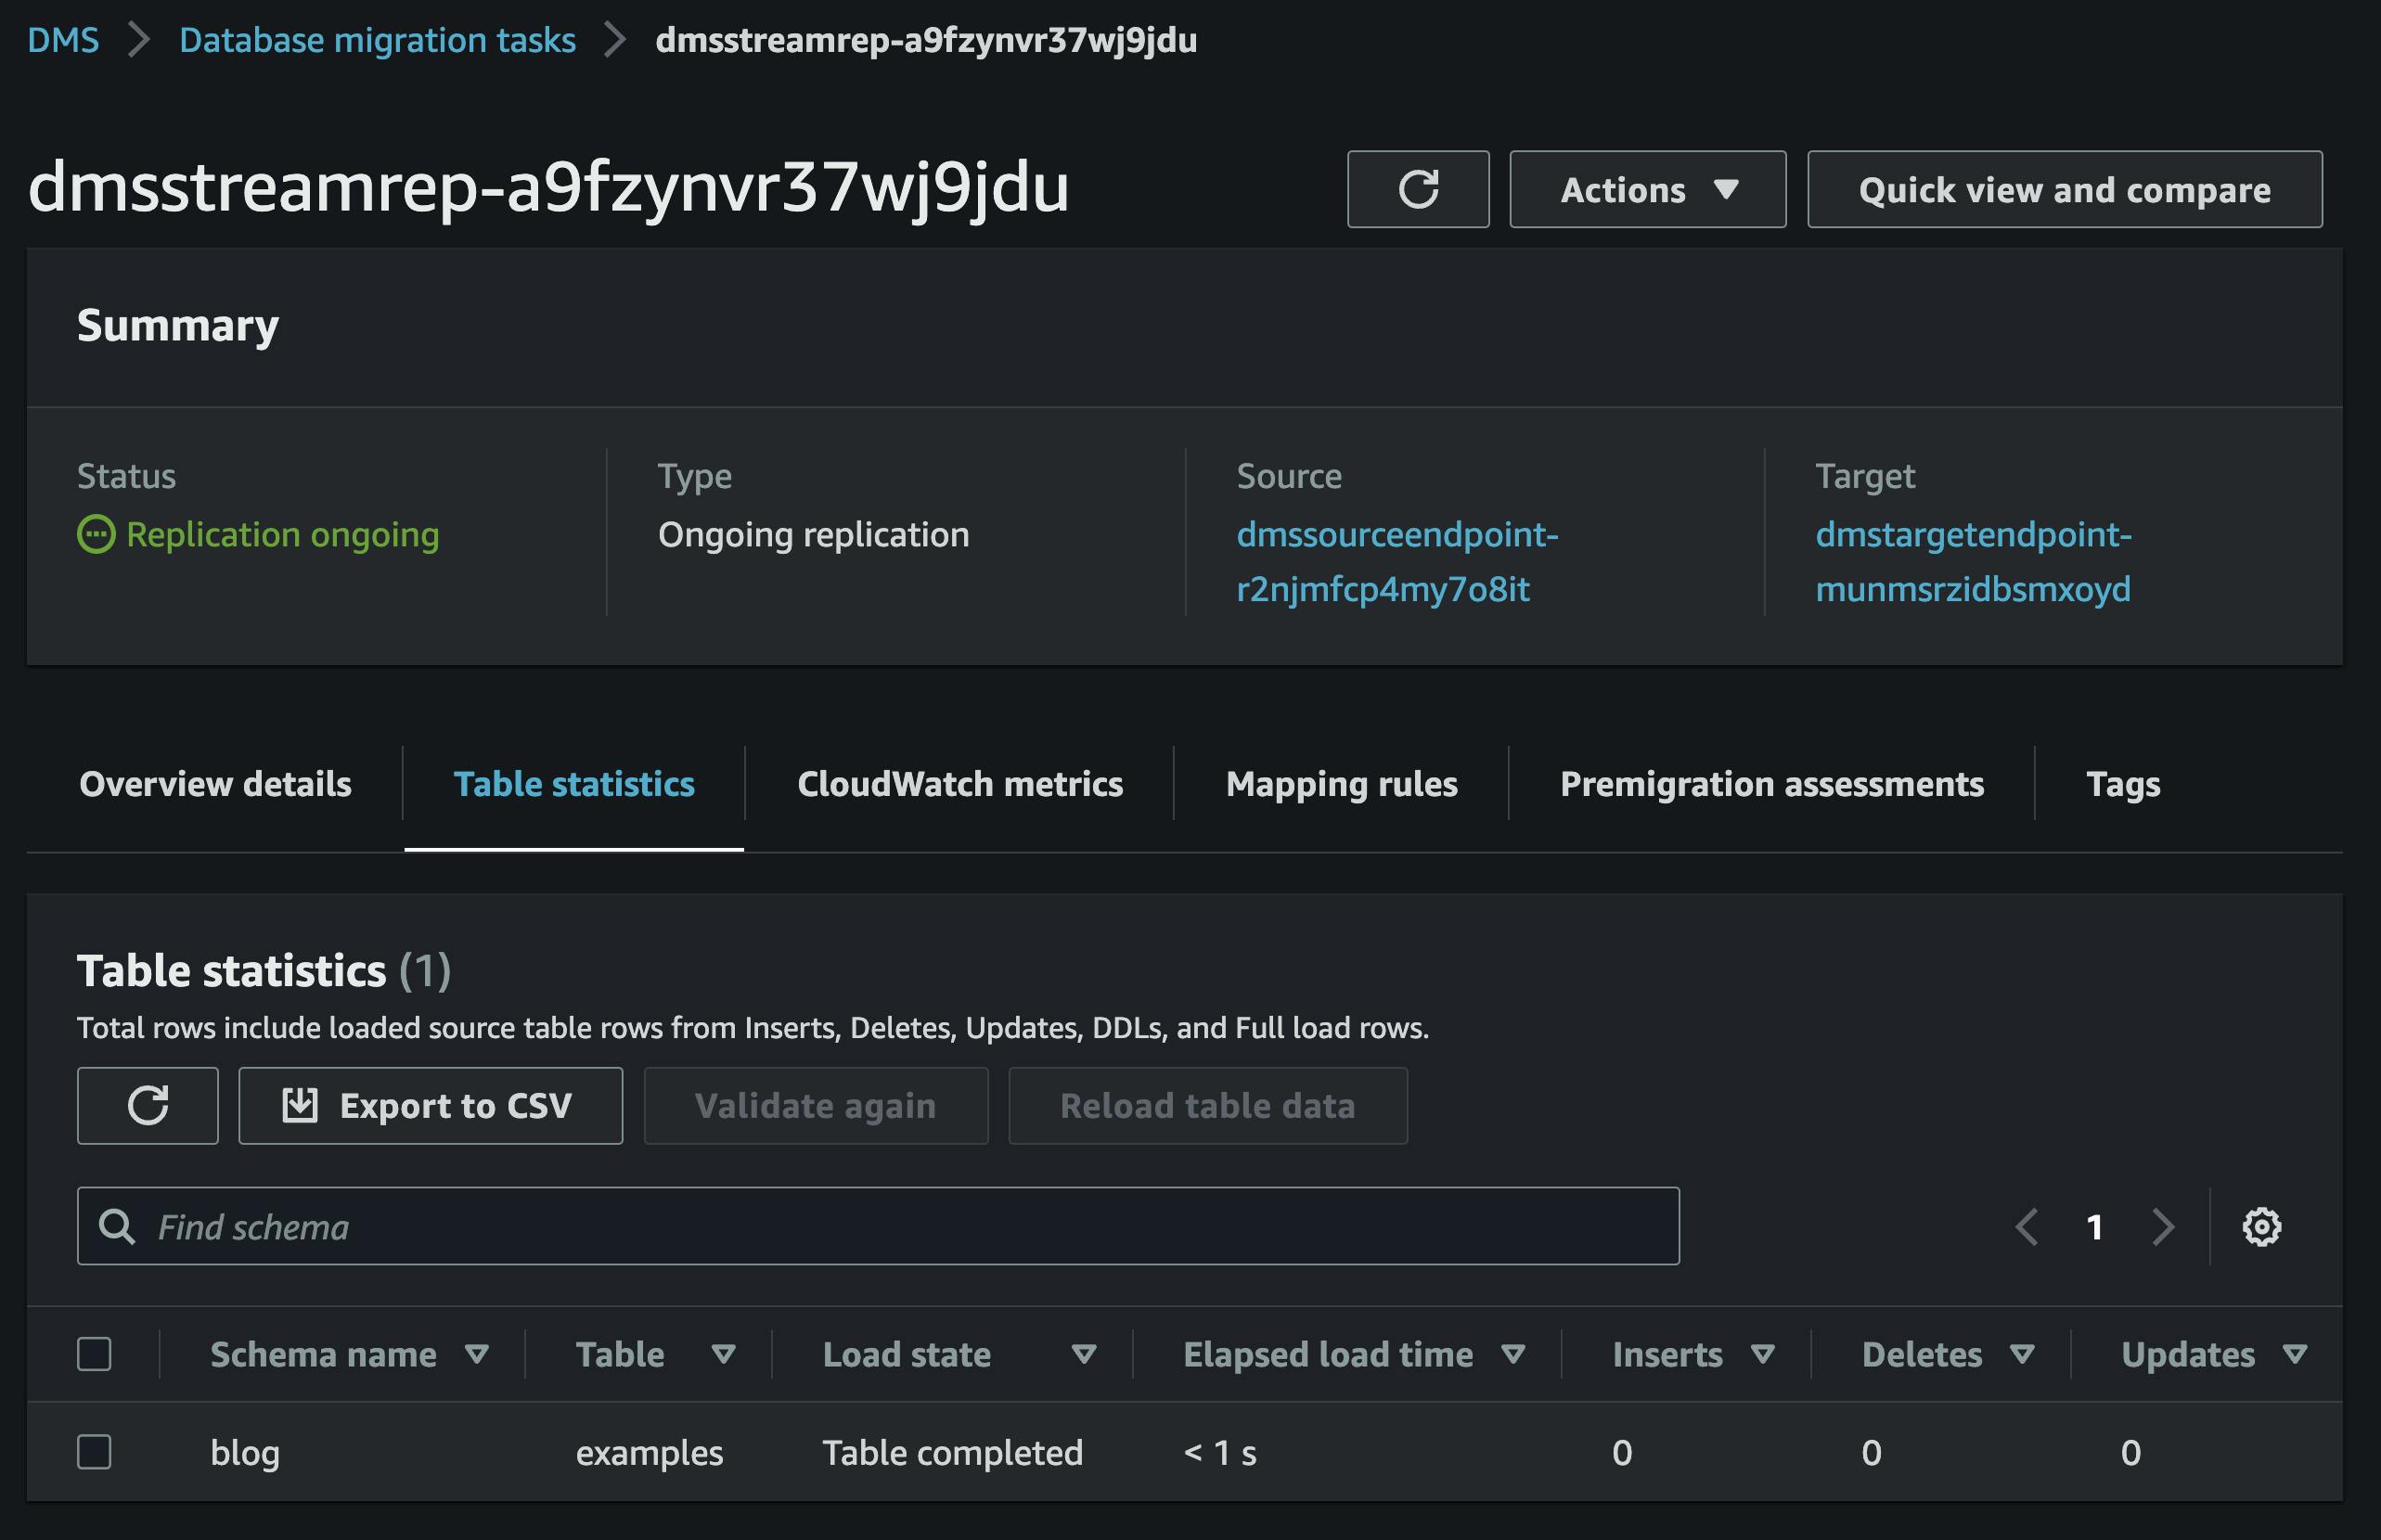
Invoking our seed lambda function will insert a row into the table. After a short time, the table statistics page will reflect the insert operation.

If we invoke a lambda from the kinesis stream, it will get the following event:
{
    "record": {
        "kinesis": {
            "kinesisSchemaVersion": "1.0",
            "partitionKey": "blog.examples",
            "sequenceNumber": "49642050638404656466522708801490648817992453925189451794",
            "data": "ewoJImRhdGEiOgl7CgkJImlkIjoJMSwKCQkiZXhhbXBsZSI6CSJoZWxsbyA2MzkiCgl9LAoJIm1ldGFkYXRhIjoJewoJCSJ0aW1lc3RhbXAiOgkiMjAyMy0wNi0yNVQxNToyMToxNC4wNTUxMzdaIiwKCQkicmVjb3JkLXR5cGUiOgkiZGF0YSIsCgkJIm9wZXJhdGlvbiI6CSJpbnNlcnQiLAoJCSJwYXJ0aXRpb24ta2V5LXR5cGUiOgkic2NoZW1hLXRhYmxlIiwKCQkic2NoZW1hLW5hbWUiOgkiYmxvZyIsCgkJInRhYmxlLW5hbWUiOgkiZXhhbXBsZXMiLAoJCSJ0cmFuc2FjdGlvbi1pZCI6CTEyODg0OTAyNjA5Cgl9Cn0=",
            "approximateArrivalTimestamp": 1687706474.102
        },
        "eventSource": "aws:kinesis",
        "eventVersion": "1.0",
        "eventID": "shardId-000000000001:49642050638404656466522708801490648817992453925189451794",
        "eventName": "aws:kinesis:record",
        "invokeIdentityArn": "arn:aws:iam::359317520455:role/BlogDmsStreamStack-streamkinesisServiceRole6A79529-7U8Q9JUVULLO",
        "awsRegion": "us-east-1",
        "eventSourceARN": "arn:aws:kinesis:us-east-1:359317520455:stream/db-stream"
    }
}
It's worth noting that Kinesis Base64 encodes the data, so decoding is necessary to make it usable. By decoding the event's data we get the following:
{
    "data": {
        "id": 1,
        "example": "hello 639"
    },
    "metadata": {
        "timestamp": "2023-06-25T15:21:14.055137Z",
        "record-type": "data",
        "operation": "insert",
        "partition-key-type": "schema-table",
        "schema-name": "blog",
        "table-name": "examples",
        "transaction-id": 12884902609
    }
}
By examining the decoded event, we can determine that it was an "insert" operation, and the "data" field contains the full row. In this case, since it was an insert, there is no "before" image.
If a row is updated, the event will contain an image representing the changes.
{
    "parsed": {
        "data": {
            "id": 1,
            "example": "hello 297"
        },
        "before": {
            "id": 1,
            "example": "hello 639"
        },
        "metadata": {
            "timestamp": "2023-06-25T15:50:51.449661Z",
            "record-type": "data",
            "operation": "update",
            "partition-key-type": "schema-table",
            "schema-name": "blog",
            "table-name": "examples",
            "transaction-id": 12884903827
        }
    }
}
From there you could calculate a diff to see that the example column went from hello 639 to hello 297.
Conclusion
In conclusion, this comprehensive guide has provided you with the knowledge and steps necessary to create an Aurora MySQL Database, initialize it using Custom Resources, and set up a Change Data Capture (CDC) Stream with AWS CDK, AWS Data Migration Service (DMS), and Kinesis. By leveraging AWS DMS and event-driven architecture principles, you can unlock the full potential of real-time data replication and event streaming.
As you move forward, there are several ways you can expand on the concepts and ideas covered in this guide. Here are a few suggestions:
Explore Advanced CDC Stream Configurations: Dive deeper into the configuration options available with DMS CDC streams. Experiment with table mappings, filtering options, and advanced settings to tailor the replication process to your specific use cases.
Integrate Additional AWS Services: Consider integrating other AWS services into your event-driven architecture. For example, you could explore using AWS Lambda to process the replicated events, Amazon S3 for data storage, or AWS Glue for data cataloging and ETL operations.
Implement Event-Driven Microservices: Build event-driven microservices that consume the CDC stream events to trigger actions or updates across different systems. Explore how you can use services like AWS Step Functions or AWS EventBridge to orchestrate complex workflows based on the captured events.
Scale and Optimize: Experiment with scaling and optimizing your CDC stream setup. Explore strategies for handling high-velocity data streams, optimizing performance, and implementing fault-tolerant architectures.
Monitor and Analyze: Set up monitoring and analytics solutions to gain insights into your event-driven system. Utilize services like Amazon CloudWatch, AWS X-Ray, or AWS AppSync to track and analyze the performance, reliability, and usage patterns of your CDC stream and associated components.
By expanding on the ideas presented in this guide, you can harness the full potential of a Change Data Capture stream in an event-driven architecture. This approach allows you to build scalable, real-time systems that react to changes in your data and drive intelligent decision-making in your applications. The possibilities for innovation and optimization are vast, so take this foundation and continue exploring the exciting world of event-driven architectures.