


From Code to Conversation: Bridging GitHub Actions and Slack with CDK
The Slack Integration Every Dev Team Needs


In this post, we're diving into the powerful world of automation using the AWS Cloud Development Kit (CDK) to create a serverless-backed Slack App. The goal? Seamlessly managing application deployments through GitHub Deployments. Here's a glimpse into how it all ties together:
GitHub Deployments notifies our serverless app, which consists of an AWS API Gateway Rest API backed by multiple lambda functions. One of these lambdas gets invoked by the GitHub Deployments webhook to handle deployment status updates.
Once informed, our bot relays these updates to a Slack channel.
Upon a successful deployment, the bot prompts users with, "Do you want to deploy this to the next environment?"
Users have the option to greenlight this deployment or reject it.
And when it comes to the all-important production environment, only selected approvers can make the final decision. Others can voice their views through a "vote".
The best part? Although our demonstration employs CDK, this framework isn't limited to CDK deployments. You can adapt it for any project deployable via GitHub Actions, making it a flexible tool for various deployment needs.

Here's a structured flow of our approach:
Setting up a placeholder for secret tokens.
Constructing the CDK App with key components: RestApi, DynamoDB, and several lambdas.
Safeguarding the GitHub access token and Slack Bot token inside our placeholder.
Integrating the GitHub Deployment Webhook.
Ensuring seamless Slack interactions.
Incorporating GitHub Deployments within our GitHub Actions workflows.
Eager to dive into the code? Check out the project on GitHub: https://github.com/martzcodes/blog-cicd-slackbot.
Note: This project has multiple layers, and we won't be delving into each line of code. If you find any part lacking, don't be shy. Drop your questions in the comments or catch me on Mastodon at https://awscommunity.social/@martzcodes.
Create a Placeholder Secret
Why a Placeholder?: Before diving in, you might wonder why we're setting placeholders. When working with AWS CDK, there's a tendency to automate the creation of secrets. However, I've found this method can sometimes reset these secrets unintentionally. And although CloudFormation is an option, it would expose our Secret values in its YAML file. This is where manually set placeholders come in handy — they ensure our secrets remain secret.
Let's get started:
Head over to the AWS Console and create a new Secret.
Choose the "Other type of secret" option.
Toggle over to the
Plaintextoption under the Key/value pairs tab.For the value, enter:
{"SLACK_TOKEN":"xoxb-placeholder","GITHUB_TOKEN":"github_pat_placeholder"}.Click on "Next".
Name your secret
slackbot-deployer.Proceed by clicking "Next".
Opt for "No rotation" and click "Next".
Finally, click on "Store" to save the secret.
Once saved, refreshing the secrets list will show you the secret's details. Look out for the secret ARN, which will appear something like this: arn:aws:secretsmanager:us-east-1:123456789012:secret:slackbot-deployer-XYZ123. Keep this ARN handy, as we'll integrate it into our CDK App in the subsequent steps.
Deploying the CDK App
Time to create our CDK App! If you're looking to speed things up, grab the example code from my GitHub. Alternatively, for the DIY enthusiasts, start a CDK project from the ground up. Navigate to your desired project folder and initiate the project with:
npx cdk init --language typescript
This command spins up a CDK version 2 project. If you've been working with a globally installed version 1 CDK, it's time to uninstall it and stick with npx.
Once our app is initialized, we're going to make changes to the bin/blog-cicd-slackbot.ts file to introduce necessary configurations.
const oidcs: Record<string, string> = {
  test: "arn:aws:iam::922113822777:role/GitHubOidcRole",
  prod: "arn:aws:iam::349520124959:role/GitHubOidcRole",
};
const nextEnvs: Record<string, string> = {
  dev: "test",
  test: "prod",
};

const app = new cdk.App();
new BlogCicdSlackbotStack(app, "BlogCicdSlackbotStack", {
  nextEnvs,
  oidcs,
  secretArn: "YOUR SECRET ARN HERE",
});
This configuration sets the stage for our environment flow and the OIDC Roles, enabling GitHub Actions to deploy CDK applications without saving secrets in GitHub. For a hands-on demonstration on crafting these OIDC roles with CDK, check out the Construct in lib/github-oidc.ts. While my roles are provisioned externally and are commented out, this should offer you a practical reference.
Create a RestAPI
Got the starter code? Jump ahead to "Deploy the App". If not, keep reading.
Let's tweak the lib/blog-cicd-slackbot-stack.ts file, first defining the Stack's Prop interface to resonate with the bin file. Here, we'll amplify the default StackProps interface by integrating three additional attributes:
export interface BlogCicdSlackbotStackProps extends cdk.StackProps {
  nextEnvs: Record<string, string>;
  oidcs: Record<string, string>;
  secretArn: string;
}
Then, modify the constructor like so:
constructor(scope: Construct, id: string, props: BlogCicdSlackbotStackProps) {
Our next move is forging the RestApi and carving out a slack/ resource:
const api = new RestApi(this, "BlogCicdSlackbotApi", {
  deployOptions: {
    dataTraceEnabled: true,
    tracingEnabled: true,
    metricsEnabled: true,
  },
  description: `API for BlogCicdSlackbotApi`,
  endpointConfiguration: {
    types: [EndpointType.REGIONAL],
  },
});
const slackResource = api.root.addResource("slack");
Let's establish our default lambda environment and properties:
const environment = {
  OIDCS: JSON.stringify(oidcs),
  SECRET_ARN: secret.secretArn,
  NEXT_ENVS: JSON.stringify(nextEnvs),
  TABLE_NAME: table.tableName,
};

const lambdaProps = {
  runtime: Runtime.NODEJS_18_X,
  memorySize: 1024,
  timeout: cdk.Duration.seconds(30),
  environment,
};
Remember: Not all our lambda functions will harness the secret/table and related functionalities. We're only granting access to lambdas if they genuinely require it. Yet, knowledge of the SECRET_ARN is harmless.
Wrap it up by creating the lambda and its endpoint:
const slackAction = new NodejsFunction(this, "SlackActionFn", {
  entry: "lib/lambda/api/slack-action.ts",
  ...lambdaProps,
});
slackResource.addResource("action").addMethod(
  "POST",
  new LambdaIntegration(slackAction)
);
Peek into my lambda's handler code present in lib/lambda/api/slack-action.ts:
import { APIGatewayEvent } from "aws-lambda";

export const handler = async (event: APIGatewayEvent) => {
  const body = JSON.parse(event.body || "{}");
  console.log(JSON.stringify({body}, null, 2));

  return {
    statusCode: 200,
    body: body.challenge,
  };
};
Heads Up!: It's essential to have esbuild and aws-lambda types added to your project. Here's how:
npm i --save-dev esbuild @types/aws-lambda
This ensures CDK avoids invoking a Docker container for lambda bundling.
Deploy the App
Everything's set? Deploy the app! Once done, you'll receive the API Url as an Output resembling:
Outputs:
BlogCicdSlackbotStack.BlogCicdSlackbotApiEndpointCDDA7E36 = https://xicnr82c7a.execute-api.us-east-1.amazonaws.com/prod/
Jot down this URL (inclusive of /prod/) – we'll integrate it into the Slack App's manifest soon.
Gathering the Secrets
Before diving deep, let's ensure we have all the secrets we need for this project safely tucked away in our placeholder Secret.
We'll retrieve two primary secrets:
GitHub Personal Access Token: Enables our application to interact with GitHub Actions.
Slack App Bot Token: Helps us create and edit Slack messages.
GitHub Personal Access Token
For this, we'll employ GitHub's fine-grained tokens, which offer precise control over permissions.
Head over to the GitHub tokens page.
Remember, these tokens come with an expiration which you can set for up to a year.
If you're working within an organization like me, set the "Resource owner" to your organization.
Grant access to All repositories (both public and private).
Then, ensure you grant the following repository-level access:
Actions: Read & Write
Deployments: Read
Environments: Read
Metadata: Read (Mandatory)
Once you've completed these steps, you can copy your access token. It'll look something like this: github_pat_BLAH. Keep this safe – we'll need it shortly.
Creating a Slack App
Time to nab the Slack App's Bot token:
Start by visiting the Slack API page.
Click on "Create New App".
Opt to create an app using a manifest:
{
    "display_information": {
        "name": "deploy-bot"
    },
    "features": {
        "bot_user": {
            "display_name": "deployer",
            "always_online": true
        },
        "slash_commands": [
            {
                "command": "/deployer_add_auth",
                "url": "REPLACE THIS WITH YOUR APIGW URL/slack/add-approver",
                "description": "Add an approver for Deployments",
                "usage_hint": "@user",
                "should_escape": true
            },
            {
                "command": "/deployer_list_auth",
                "url": "REPLACE THIS WITH YOUR APIGW URL/slack/list-approvers",
                "description": "Show who can approve deployments",
                "should_escape": false
            },
            {
                "command": "/deployer_remove_auth",
                "url": "REPLACE THIS WITH YOUR APIGW URL/slack/remove-approver",
                "description": "Remove someone as an approver",
                "usage_hint": "@user",
                "should_escape": true
            }
        ]
    },
    "oauth_config": {
        "scopes": {
            "user": [
                "users.profile:read"
            ],
            "bot": [
                "app_mentions:read",
                "channels:history",
                "chat:write",
                "chat:write.customize",
                "chat:write.public",
                "emoji:read",
                "groups:history",
                "groups:read",
                "groups:write",
                "im:history",
                "im:read",
                "im:write",
                "incoming-webhook",
                "pins:read",
                "pins:write",
                "reactions:read",
                "reactions:write",
                "users:read",
                "users.profile:read",
                "commands"
            ]
        }
    },
    "settings": {
        "event_subscriptions": {
            "request_url": "REPLACE THIS WITH YOUR APIGW URL/slack/action",
            "bot_events": [
                "app_mention"
            ]
        },
        "interactivity": {
            "is_enabled": true,
            "request_url": "REPLACE THIS WITH YOUR APIGW URL/slack/interaction"
        },
        "org_deploy_enabled": false,
        "socket_mode_enabled": false,
        "token_rotation_enabled": false
    }
}
Once the app's up and running, install it in your workspace.
Navigate to the
OAuth & Permissionspage to fetch theBot User OAuth Token.
Update the Placeholder Secret
Armed with both tokens, revisit your placeholder Secret on the AWS Console. Here's what you do:
Click on
Retrieve secret value.Choose
Edit.Enter the tokens in their respective key-value fields.
Don't forget to hit "Save" after inputting both tokens.
Get ready, the exciting part is about to start!
Setting Up the GitHub Deployment Webhook Integration
Integrating GitHub Deployment Status webhook can be a game-changer. Not only will it ensure timely Slack notifications but also helps in maintaining a reliable history in DynamoDB.
1. Provisioning a DynamoDB Table
Firstly, we need to create a table where deployments will be recorded:
const table = new Table(this, "Table", {
  partitionKey: { name: "pk", type: AttributeType.STRING },
  sortKey: { name: "sk", type: AttributeType.STRING },
  billingMode: BillingMode.PAY_PER_REQUEST,
  removalPolicy: cdk.RemovalPolicy.DESTROY,
  timeToLiveAttribute: "ttl",
});
This table is straightforward. Given that our traffic isn't predictable, opting for the Pay Per Request model ensures cost-effectiveness.
2. Incorporating the Secret
Before we proceed, it's essential to incorporate the secret saved from the earlier stages:
const secret = Secret.fromSecretCompleteArn(this, `BlogCicdSlackbotSecret`, secretArn);
3. Lambda & API Gateway Endpoint
As there’s only one GitHub endpoint, bundling the creation of both the Lambda function and its associated resource streamlines the process. Make sure the Lambda function can access both DynamoDB and Secrets Manager:
const githubWebhookFn = new NodejsFunction(this, "GithubWebhookFn", {
  entry: "lib/lambda/api/github-webhook.ts",
  ...lambdaProps,
});
table.grantReadWriteData(githubWebhookFn);
secret.grantRead(githubWebhookFn);
api.root
  .addResource("github")
  .addMethod("POST", new LambdaIntegration(githubWebhookFn));
Dive into lib/lambda/api/github-webhook.ts to examine the logic. While the file may seem hefty, the bulk of it centers around Slack message formatting.
- Storing Deployment Details:
We extract vital details from the event to be logged in DynamoDB:
const {
  state: status,
  environment: env,
  created_at: createdAt,
  updated_at: updatedAt,
  target_url: url,
} = body.deployment_status;
const { id: deploymentId, ref: branch, sha } = body.deployment;
const repo = body.repository.name;
const author = body.deployment_status.creator.login;
const owner = body.repository.owner.login;
- Retrieving Slack Token:
Fetch the Slack token securely from Secrets Manager:
const secret = await sm.send(
  new GetSecretValueCommand({
    SecretId: process.env.SECRET_ARN,
  })
);
const slackToken = JSON.parse(secret.SecretString || "").SLACK_TOKEN;
- Managing Deployment Statuses:
When a new deployment status hits, it's crucial to determine its relative standing. We do this by fetching the most recent deployment status and comparing the deploymentId:
const pk = `REPO#${repo}#ENV#${env}`.toUpperCase();
const sk = "LATEST";

// get deployment status from dynamodb
const ddbRes = await ddbDocClient.send(
  new GetCommand({
    TableName: process.env.TABLE_NAME,
    Key: {
      pk,
      sk,
    },
  })
);
If the deploymentId from the incoming webhook doesn't match the last "LATEST" item, it implies a newer deployment has superseded it. As a result, we should:
Update the previous Slack message by removing its action buttons.
Append a note indicating
Automatic rejection by subsequent deployment.Archive the last item under a unique Sort Key, ensuring it’s retrievable but not in the immediate queue.
const slackRes = await fetch("https://slack.com/api/chat.update", {
  method: "POST",
  body: JSON.stringify({
    channel: "C04KW81UAAV",
    ts: existingItem.slackTs,
    blocks: oldBlocks,
  }),
  headers: {
    "Content-Type": "application/json",
    Authorization: `Bearer ${slackToken}`,
  },
});
await slackRes.json();
await ddbDocClient.send(
  new PutCommand({
    TableName: process.env.TABLE_NAME,
    Item: {
      ...existingItem,
      sk: `DEPLOYMENT#${existingItem.deploymentId}`.toUpperCase(),
      blocks: JSON.stringify(oldBlocks),
    },
  })
);
New deployments, on the other hand, engage the chat.postMessage Slack API, furnishing essential deployment details.
For deployments matching the "LATEST" deploymentId, it’s crucial to ensure the incoming status isn’t redundant. Successful deployments headed for another environment get approve/reject action buttons. This updated deployment, now the newest, gets stored under the "LATEST" sort key, paired with the Slack message timestamp for subsequent edits.
Lastly, successful deployments are logged in a meta item, an inventory of all triumphant deployments segregated by environment:
const envLatest = await ddbDocClient.send(
    new GetCommand({
      TableName: process.env.TABLE_NAME,
      Key: {
        pk: `LATEST`,
        sk: `${nextEnvs[env]}`,
      },
    })
  );
  const updatedRepo = {
    url: item.url,
    sha: item.sha,
    deploymentId: item.deploymentId,
    deployedAt: Date.now(),
    branch: item.branch,
    owner: item.owner,
  };
  if (!envLatest.Item) {
    await ddbDocClient.send(
      new PutCommand({
        TableName: process.env.TABLE_NAME,
        Item: {
          pk: `LATEST`,
          sk: `${nextEnvs[env]}`,
          repos: {
            [repo]: updatedRepo,
          },
        },
      })
    );
  } else {
    // Update existingItem by replacing the repo
    await ddbDocClient.send(
      new UpdateCommand({
        TableName: process.env.TABLE_NAME,
        Key: {
          pk: `LATEST`,
          sk: `${nextEnvs[env]}`,
        },
        // update the repos attribute
        UpdateExpression: "SET repos.#repo = :repo",
        ExpressionAttributeNames: {
          "#repo": repo,
        },
        ExpressionAttributeValues: {
          ":repo": updatedRepo,
        },
      })
    );
  }
The structuring of this meta item is worth noting. The deployment details nestle within a repos map in DynamoDB. Leveraging UpdateCommand helps pinpoint updates to specific repositories, ensuring that new build data doesn't accidentally overwrite unrelated data due to race conditions.
4. Integrating the GitHub Webhook
Navigate to your GitHub Organization's settings. Create a fresh webhook with the following attributes:
Payload URL:
your-apigateway-url/githubContent type:
application/jsonSSL Verification: Enabled
Events: Specifically opt for
Deployment statusesStatus: Active
Finalize your configurations. Now, every GitHub Deployment activates the Lambda, meticulously processing deployment data in line with your design.
Integrating Slack Interactions
Let's enhance the workflow and user experience by setting up Slack interactions for our deployment notifications.
1. Establishing the Interaction Endpoint
To catch Slack interactions like button presses, we need a dedicated endpoint. Update the lib/blog-cicd-slackbot-stack.ts to introduce this Lambda function and endpoint:
const slackInteractiveFn = new NodejsFunction(this, "SlackInteractiveFn", {
  entry: "lib/lambda/api/slack-interactive.ts",
  ...lambdaProps,
});
table.grantReadWriteData(slackInteractiveFn);
secret.grantRead(slackInteractiveFn);
slackResource
  .addResource("interaction")
  .addMethod("POST", new LambdaIntegration(slackInteractiveFn));
Though the handler for this function (lib/lambda/api/slack-interactive.ts) is extensive, it's primarily devoted to processing Slack messages and extracting information from the event.
- Decoding the Slack Payload:
Given Slack's use of the x-www-form-urlencoded content type, manual decoding becomes imperative:
const decodedString = decodeURIComponent(event.body!);
const jsonString = decodedString.replace("payload=", "");
const jsonObject = JSON.parse(jsonString);
const message = jsonObject.message;
const approved = jsonObject.actions[0].value === "approved";
const repo = jsonObject.message.text.split("Repo:*\n")[1].split("+")[0];
const env = jsonObject.message.text
  .split("+deployment+to+")[1]
  .split("+by+")[0];
const authority = jsonObject.user.name; // user who did the interaction
const branch = jsonObject.message.text.split("Branch:*\n")[1].split("+")[0];
- Fetching Tokens:
This Lambda could require tokens for both GitHub and Slack. Thus, let’s retrieve them:
const secret = await sm.send(
  new GetSecretValueCommand({
    SecretId: process.env.SECRET_ARN,
  })
);
const slackToken = JSON.parse(secret.SecretString || "").SLACK_TOKEN;
const githubToken = JSON.parse(secret.SecretString || "").GITHUB_TOKEN;
- Retrieving User's Image:
To enrich our Slack messages with user details, fetch the user's profile picture via the Slack API:
const slackAuthorityRes = await fetch(
  `https://slack.com/api/users.profile.get?user=${jsonObject.user.id}`,
  {
    method: "GET",
    headers: {
      "Content-Type": "application/json",
      Authorization: `Bearer ${slackToken}`,
    },
  }
);
const slackAuthority = await slackAuthorityRes.json();
const userImg = slackAuthority.profile.image_24;
- Processing Slack Messages:
A series of operations then follows:
Embed the user's profile picture, corresponding to their action (approve/reject).
Handle vote changes to ensure clarity in responses.
For deployments to "prod", cross-verify the user's authority against a list of approved users.
On gaining approval:
Update the LATEST deployment item status
Retrieve the workflow list for the repository, enabling us to identify the correct
workflowIdInitiate the deployment for the succeeding environment
await ddbDocClient.send(
  new PutCommand({ TableName: process.env.TABLE_NAME, Item: existingItem })
);
const githubListWorkflowsRes = await fetch(
  `https://api.github.com/repos/${existingItem.owner}/${repo}/actions/workflows`,
  {
    method: "GET",
    headers: {
      Accept: "application/vnd.github+json",
      "X-GitHub-Api-Version": "2022-11-28",
      Authorization: `Bearer ${githubToken}`,
    },
  }
);
const { workflows } = await githubListWorkflowsRes.json();
const workflow = workflows.find(
  (workflow: any) => workflow.name === "deploy-to-env"
);
await fetch(
  `https://api.github.com/repos/${existingItem.owner}/${repo}/actions/workflows/${workflow.id}/dispatches`,
  {
    method: "POST",
    body: JSON.stringify({
      ref: branch,
      inputs: {
        deploy_env: nextEnvs[env],
        oidc_role: oidcs[nextEnvs[env]],
      },
    }),
    headers: {
      Accept: "application/vnd.github+json",
      "X-GitHub-Api-Version": "2022-11-28",
      Authorization: `Bearer ${githubToken}`,
    },
  }
);
Concluding this segment, the Slack message is refreshed, and the updated information is stored in DynamoDB.
2. Managing Approvers
The next phase involves facilitating the management of deployment approvers via Slack slash commands. Three distinct Lambdas will handle these functionalities – addition, removal, and listing of approvers.
An initial approver sets the tone, and subsequent approvals or removals of approvers happen under their discretion. To glean details about an approver, like their name, email, or profile picture, the add-approver endpoint uses the Slack Token.
For those eager to dive into the implementation, the code is hosted in the following:
lib/lambda/api/slack-add-approver.tslib/lambda/api/slack-list-approvers.tslib/lambda/api/slack-remove-approver.ts
Though we're summarizing this section, remember that having a robust system of approval is paramount, especially for production deployments.
Setting Up GitHub Deployments with GitHub Actions
To harness the power of GitHub Deployments, let's configure some environments for your project.
1. Configuring Environments:
First, head to your repository's settings page and open the Environments tab. For instance, the URL might resemble: https://github.com/martzcodes/blog-cicd-slackbot/settings/environments. Here, introduce a fresh environment for each stage you aim to monitor. Ensure their names correspond with your nextEnvs configuration object. For example, my setup included dev, test, and prod.
2. Configuring GitHub Actions:
Now, ensure your deployment-focused GitHub Actions are set to employ GitHub Deployments. Some sample workflows are available at: GitHub Sample Workflows.
The pipeline.yml file, which springs into action upon commits to the main branch, facilitates continuous deployment to the dev environment. This action sets the stage for our Slack integration. Notably, this pipeline is named Deploy - a detail the GitHub webhook Lambda verifies.
Subsequently, the deploy-to-env.yml workflow is tailored to possess matching inputs. Triggered by the pipeline.yml workflow, both workflow_call and workflow_dispatch triggers accept these inputs:
inputs:
  deploy_env:
    description: 'Environment to deploy to'
    required: true
    type: string
  oidc_role:
    description: 'OIDC Role to assume for deployment'
    required: true
    type: string
Although your deployment steps could differ, it's crucial to encapsulate your deployment within status update stages:
  - name: start deployment
    uses: bobheadxi/deployments@v1.2.0
    id: deployment
    with:
      step: start
      env: ${{ inputs.deploy_env }}
  - name: ${{ inputs.deploy_env }} deploy
    env:
      DEPLOY_ENV: ${{ inputs.deploy_env }}
    run: npx cdk deploy --ci --require-approval never --concurrency 5 -v
  - name: update deployment status
    uses: bobheadxi/deployments@v1.2.0
    with:
      step: finish
      status: ${{ job.status }}
      env: ${{ inputs.deploy_env }}
      deployment_id: ${{ steps.deployment.outputs.deployment_id }}
The central idea here is that the bobheadxi/deployments action communicates with GitHub's API to register a deployment for the relevant environment. For a clearer perspective, a live example resides here: Live GitHub Example.
Live Demonstration
Let's observe this integration in its full glory.
1 - Initialization: Using the Slack slash command /deployer_list_auth, I'll confirm our approver list starts empty:

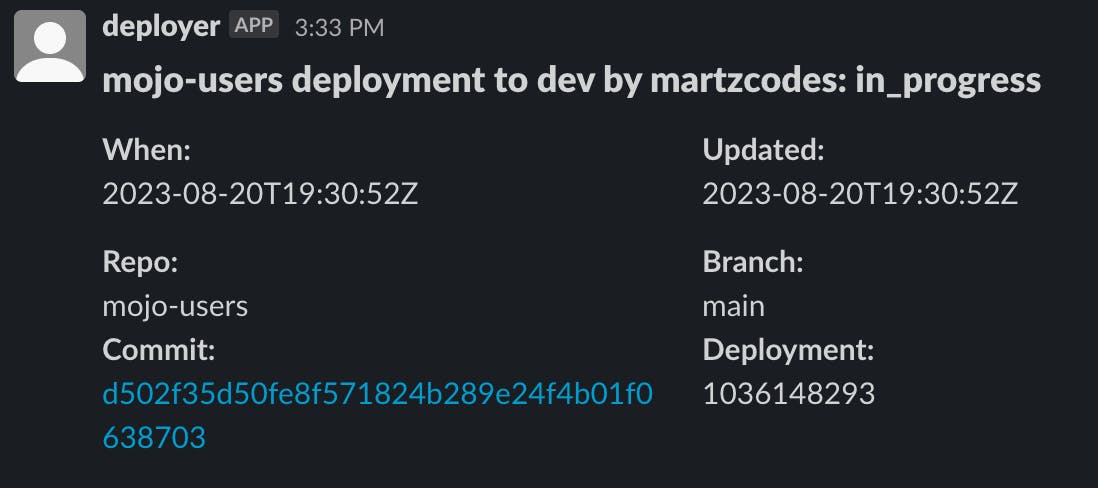
2 - Commencing a Deployment: I'll initiate a deployment in my dev environment and after a brief wait an in_progress message surfaces:
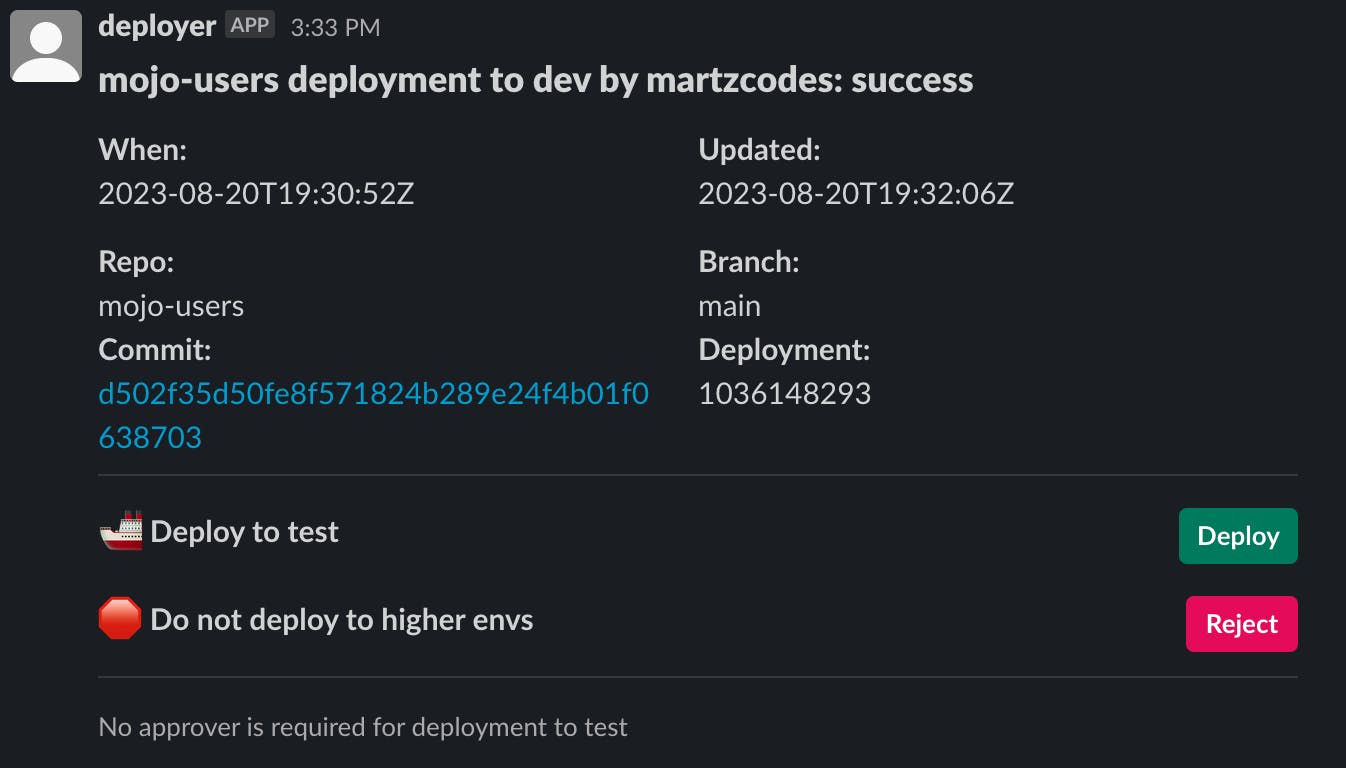
3 - Deployment Completion: On the successful completion of the deployment, our message updates, introducing action buttons. Given our next environment, "test", no approvers are mandated:
4 - Deployment Approval: Tapping the "Approve" button results in another message transformation, indicating approval along with the removal of the action buttons:

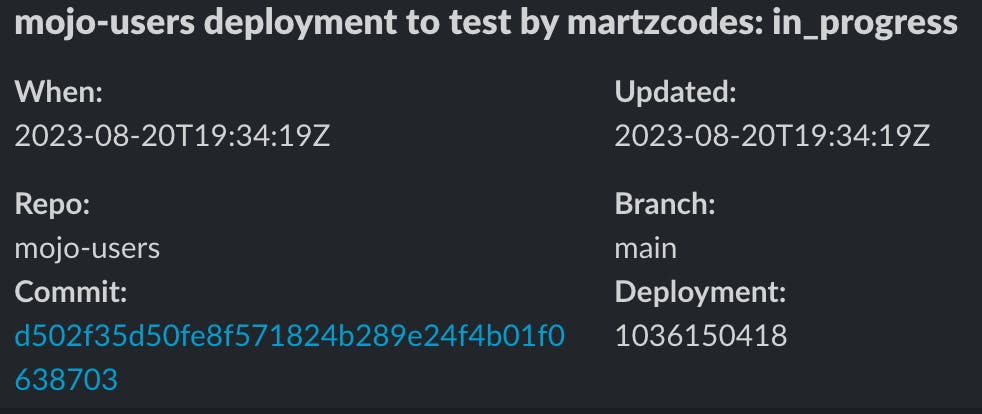
5 - Test Environment Deployment: Shortly, the in_progress message for the test environment arrives:
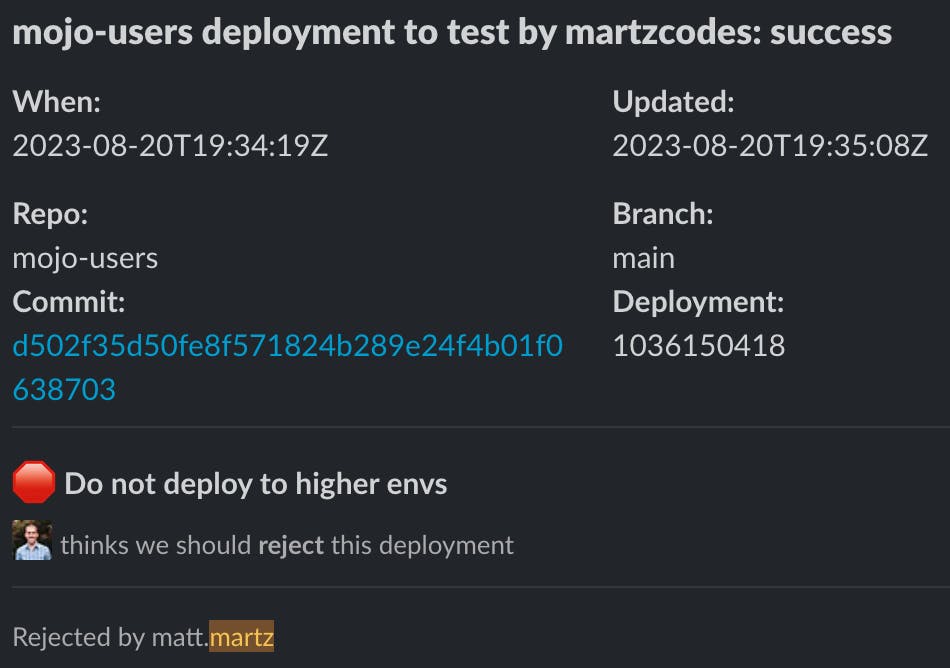
6 - Rejection Attempt: After the test environment has a successful deployment and the buttons appear... As an outsider to the approver list, my "Reject" action prompts an updated message, retaining the buttons:

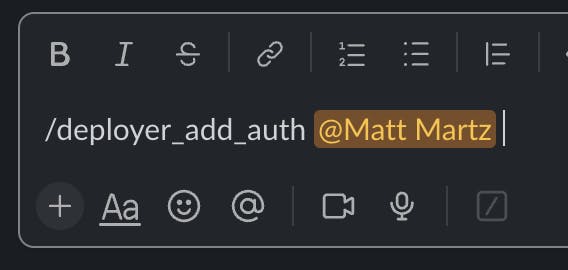
7 - Adding to the Approver List: I'll employ the /deployer_add_auth command to add myself to the approver list:
8 - Final Rejection: After clicking the "Reject' button again the deployment is successfully rejected, with our message updated accordingly:
Conclusion
The intertwining of continuous integration and deployment with communication tools, as we've explored in this journey, opens a myriad of possibilities. Not only does it seamlessly merge developer actions with team-wide notifications, but it also introduces an additional layer of transparency and control over our deployment processes. The adaptability of the systems we've integrated, namely GitHub and Slack, offer a rich tapestry of features to build upon, as demonstrated by our use of GitHub Deployment and its potential with GitHub Actions.
It's worth noting the original plan was to leverage GitHub Deployment Protection rules. These rules present a solid framework for controlling deployments in a more granular way. However, a significant limitation arose: their availability is restricted to either public repositories or those operating under GitHub Enterprise. This limitation led to a more creative approach, embedding the essence of what these rules offer, but in a broader context suitable for various repository types.
To conclude, technology continues to provide tools and platforms, ripe with features and functionalities, waiting to be moulded and interconnected in ways that best suit our needs. This exploration was just a glimpse into the vast world of CI/CD and team communication integrations. As you embark on your own integrative ventures, remember that while off-the-shelf solutions are great, sometimes thinking outside the box— or outside the repository, in this case— can lead to even more robust and tailor-made solutions for your team.