


Are you tired of constantly managing your CDK Stacks and dealing with the associated costs? If so, self-destructing CDK Stacks might be the solution you've been looking for. With the ability to automatically delete themselves after a set time, these stacks can help free up resources and streamline your development process.
In this guide, we'll show you how to set up self-destructing CDK Stacks and integrate them into your CI/CD pipeline. By doing so, you can reduce costs and improve the efficiency of your development process. We'll also share some best practices and tips to help you make the most out of this feature. So, if you're ready to optimize your development process, read on to learn how to implement self-destructing CDK Stacks! 🤯
Code: https://github.com/martzcodes/blog-cdk-self-destruct
What Will We Make?
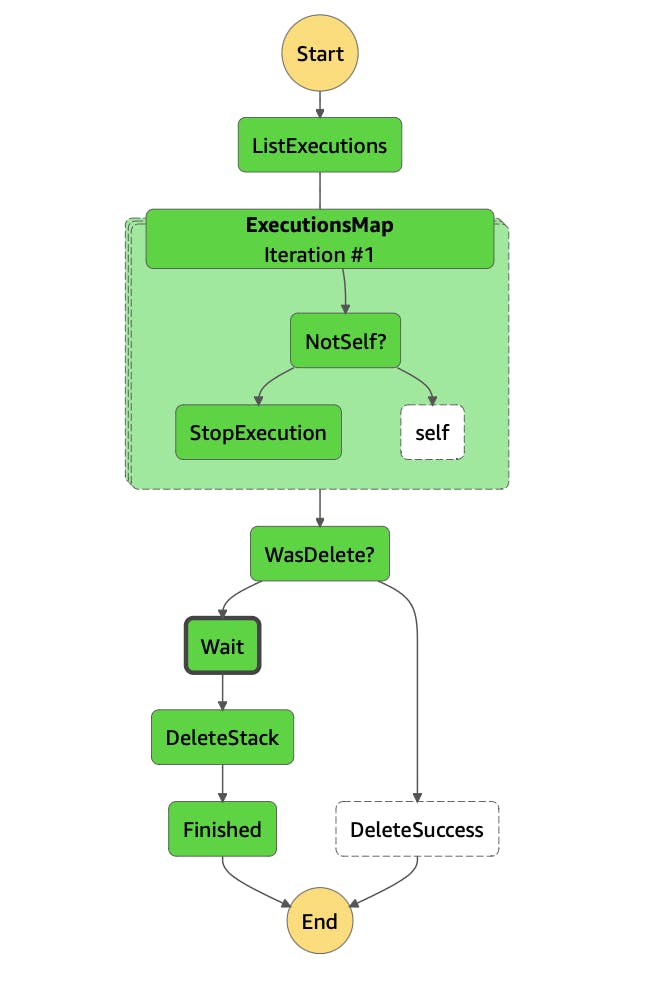
We'll create a Step Function that will be executed during the deployment of a Stack and will wait for a specified period of time. Since Step Functions are charged based on state transitions, and not the duration of the run, this will not result in additional costs. Additionally, Standard Step Functions can run for up to a year, providing us with plenty of flexibility. Once the Wait period is over, the Step Function will use the AWS SDK to automatically delete the Stack. 🗑️
Creating a SelfDestruct Construct
We're going to get started by creating a new CDK Construct that can be used in any project. The only thing this Construct will need as a property input will be the Duration that we want the stack to destroy itself after.
export interface SelfDestructProps {
  duration: Duration;
}

export class SelfDestruct extends Construct {
  constructor(scope: Construct, id: string, props: SelfDestructProps) {
    super(scope, id);
    const { duration } = props;
  }
}
From here, we're going to want the Step Function to handle a few things. It should:
Re-execute the Step Function on every Stack deployment
Close out old executions on new deployments (only have one execution running at any given time)
Wait for a pre-defined duration
Delete the Stack after the Wait period
List Already Running Step Functions
First, we need to get the list of running executions of this Step Function. We can do that with the states:ListExecutions SDK Command.
const listExecutions = new CallAwsService(this, `ListExecutions`, {
  action: "listExecutions",
  iamAction: "states:ListExecutions",
  iamResources: ["*"],
  parameters: {
    "StateMachineArn.$": "$$.StateMachine.Id",
    StatusFilter: "RUNNING",
  },
  service: "sfn",
});
🏃♂️We pass in the StatusFilter: "RUNNING" to make sure we only get back executions that are still in the RUNNING state. Typically there should only be one of these (from the last deployment).
Stop Other Executions
Next we'll want to Map over the returned Executions. Maps are Step Function for-loops, effectively.
const executionsMap = new Map(this, `ExecutionsMap`, {
  inputPath: "$.Executions",
});
In this loop, we're going to want to make sure that the execution isn't going to kill itself (not yet at least). We do this by checking the map item's Execution Id versus the current running execution's Arn:
const stopExecution = new CallAwsService(this, `StopExecution`, {
  action: "stopExecution",
  iamAction: "states:StopExecution",
  iamResources: ["*"],
  parameters: {
    Cause: "Superceded",
    "ExecutionArn.$": "$.ExecutionArn",
  },
  service: "sfn",
});

executionsMap.iterator(
  new Choice(this, "NotSelf?")
    .when(
      Condition.not(
        Condition.stringEqualsJsonPath("$.ExecutionArn", "$$.Execution.Id")
      ),
      stopExecution
    )
    .otherwise(new Pass(this, "self"))
);
$.ExecutionArn refers to the mapped execution's item and $$.Execution.Id refers to the Step Function itself... that is $$ is an escape to "top-level".
Check and Wait to Delete
Next, we can check the State Machine to make sure this resource isn't invoking because of a Stack that is already destroying itself. If it is, we can exit. This is actually very nice because since we just killed the other executions, we're tying up loose ends from previous deployments by making sure that there won't be any executions running.
const wait = new Wait(this, "Wait", {
  time: WaitTime.duration(duration),
});
const wasDelete = new Choice(this, "WasDelete?")
  .when(
    Condition.stringEquals("$$.Execution.Input.Action", "Delete"),
    new Succeed(this, "DeleteSuccess")
  )
  .otherwise(wait);
As part of this, we end up Waiting the duration we set. This could be anywhere from seconds to days (up to 1 year).
After the Wait is over, we need to delete the stack:
const deleteStack = new CallAwsService(this, `DeleteStack`, {
  action: "deleteStack",
  iamAction: "cloudformation:DeleteStack",
  iamResources: ["*"],
  parameters: {
    "StackName.$": "$$.Execution.Input.StackName",
  },
  service: "cloudformation",
});
This is done by an AWS SDK Call cloudformation:DeleteStack.
Creating the State Machine
With all the steps created, we can tie them together to create the actual Step Function:
const finished = new Succeed(this, `Finished`);

listExecutions.next(executionsMap);
executionsMap.next(wasDelete);
wait.next(deleteStack);
deleteStack.next(finished);

const sm = new StateMachine(this, `SelfDestructMachine`, {
  definition: listExecutions,
});
Running the Step Function with Every Deployment
This construct is only useful if it is consistently run with Stack Deployments. So, let's add a Custom Resource that executes the Step Function as part of the Deployment. We can do this with an AwsCustomResource construct:
new AwsCustomResource(this, `SelfDestructCR`, {
  onCreate: {
    action: "startExecution",
    parameters: {
      input: JSON.stringify({
        Action: "Create",
        StackArn: Stack.of(this).stackId,
        StackName: Stack.of(this).stackName,
      }),
      stateMachineArn: sm.stateMachineArn,
    },
    physicalResourceId: PhysicalResourceId.of("SelfDestructCR"),
    service: "StepFunctions",
  },
  onDelete: {
    action: "startExecution",
    parameters: {
      input: JSON.stringify({
        Action: "Delete",
        StackArn: Stack.of(this).stackId,
        StackName: Stack.of(this).stackName,
      }),
      stateMachineArn: sm.stateMachineArn,
    },
    physicalResourceId: PhysicalResourceId.of("SelfDestructCR"),
    service: "StepFunctions",
  },
  onUpdate: {
    action: "startExecution",
    parameters: {
      input: JSON.stringify({
        Action: "Update",
        Version: new Date().getTime().toString(),
        StackArn: Stack.of(this).stackId,
        StackName: Stack.of(this).stackName,
      }),
      stateMachineArn: sm.stateMachineArn,
    },
    physicalResourceId: PhysicalResourceId.of("SelfDestructCR"),
    service: "StepFunctions",
  },
  policy: AwsCustomResourcePolicy.fromSdkCalls({
    resources: [sm.stateMachineArn],
  }),
});
When the Stack deploys it makes a different SDK call based on the type of Stack operation (Create, Update, Delete). Custom Resources only execute when input parameters change. onCreate and onDelete are considered "new" since the stack is being created or destroyed, but in order to make sure the onUpdate call happens we have to touch an input parameter within it. That's why we set the Version to the current time.
Tips for Self-Destruction
💡 Did you notice that the code above didn't explicitly set any IAM permissions? CDK + Step Functions handle all of that for you. By defining the action, and iamActions / services as part of the Step and AwsCustomResource constructs CDK automatically infers IAM permissions and make sure those are attached to the Resources so that they have access to perform their functions!
Creating a DeveloperStack
For a better DevEx you could create a standardized Stack template that includes the self-destruct Construct by default. For example, you could publish BlogCdkSelfDestructStack as your common stack in an npm library:
export class BlogCdkSelfDestructStack extends cdk.Stack {
  constructor(scope: Construct, id: string, props?: cdk.StackProps) {
    super(scope, id, props);

    new SelfDestruct(this, `SelfDestruct`, {
      duration: Duration.minutes(3),
    });
  }
}
When teams create new projects, instead of creating a stack and basing it off of cdk.Stack .... they would base it off of BlogCdkSelfDestructStack which has self-destruction built in!
Automatically Detecting Temporary Stacks
Clearly you don't want your production stacks to delete themselves. Another tip would be to introduce a property into your Base stack that indicates whether it should self-destruct or not. You could do this by stack naming conventions, or have a developer or CI/CD property. For example:
export interface BlogCdkSelfDestructStackProps extends cdk.StackProps {
  cicd?: boolean;
  developer?: boolean;
  production?: boolean;
}
export class BlogCdkSelfDestructStack extends cdk.Stack {
  constructor(scope: Construct, id: string, props: BlogCdkSelfDestructStackProps) {
    super(scope, id, props);
    const { cicd, developer, production } = props;

    if (developer && production) {
      throw new Error("Don't use developer stacks in production");
    }

    if (!production && (developer || cicd)) {
      new SelfDestruct(this, `SelfDestruct`, {
        duration: Duration.minutes(3),
      });
    }
  }
}
And then in your bin file, you would pass in the appropriate properties (which could come from node config, environment variables / etc. CDK Best Practices recommend Configure with properties and methods, not environment variables which is why you would place these properties into your bin file.
Many CI/CD systems have pre-defined system environment variables, and those could be used to automatically detect the CI/CD for self-destruction. For example you could create a namespaced Stack that gets deployed as part of an automated PR integration check. Then succeed or fail the stack would automatiaclly clean up after itself without CI/CD having to do it.
Can I Extend the Wait Without Re-Deploying?
Absolutely! Simply re-execute the Step Function! This will reset the timer giving you more time if you need it.
Conclusion
And just like that, you're a self-destructing CDK Stack pro! You can now confidently say "adios" to stacks that are taking up too much space and draining your resources.
With this newfound knowledge, you can save on infrastructure costs and keep your AWS account looking fresh and tidy. Plus, you'll have the satisfaction of knowing that you're incorporating a little excitement and danger into your development process.
Just remember, with great power comes great responsibility. Be sure to set a reasonable Wait period and test your code thoroughly before deploying. And don't worry, we won't tell anyone if you shed a tear or two as your stacks go boom.