


Allen Helton is an AWS Hero and absolute LEGEND. In December he wrote a post titled "I Built a Serverless App To Cross-Post My Blogs" and after some begging from some AWS Community Builders he published his code to our shiny new AWS Community Projects GitHub Org.
Allen is quite a prolific writer and publishes his articles in (at least) four places. He has a self-hosted static blog built with Amplify using Hugo, as well as using dev.to, hashnode, and medium. His self-hosted blog on his personal domain is his primary platform and dev.to, hashnode, and medium all get canonical URLs for SEO purposes. 🌟
While Allen's code is great, it does have some limitations. For instance, it's written using SAM/yaml, requires a Hugo/Amplify built blog, effectively has no optional features, and he still manually uploads image assets to S3 for all of his articles. 😱
In this article, we'll go over my fork of Allen's code, where I have:
Converted the project to use AWS CDK
Made Hugo/Amplify and most of the other platforms optional 🚀
Added a direct (private) GitHub webhook integration
Automatically parsed images committed to GitHub and uploaded them to a public S3 Bucket (and updated the content to use them)
I'm excited to share these improvements with you and hope you find them useful!
Code: https://github.com/martzcodes/blog-crossposting-automation
Converting the Project to CDK
Let's talk about converting projects from a format, like SAM, to CDK. It can be a bit tricky, but the easiest way is to focus on the architecture. Get the architecture skeleton right first, and everything else will fall into place. 💪
So, looking at Allen's project structure, we can see that he has one DynamoDB table, five lambda functions, and a step function. One lambda is triggered by an Amplify EventBridge Event. That lambda then triggers a step function where the other four lambdas are used. 🤓
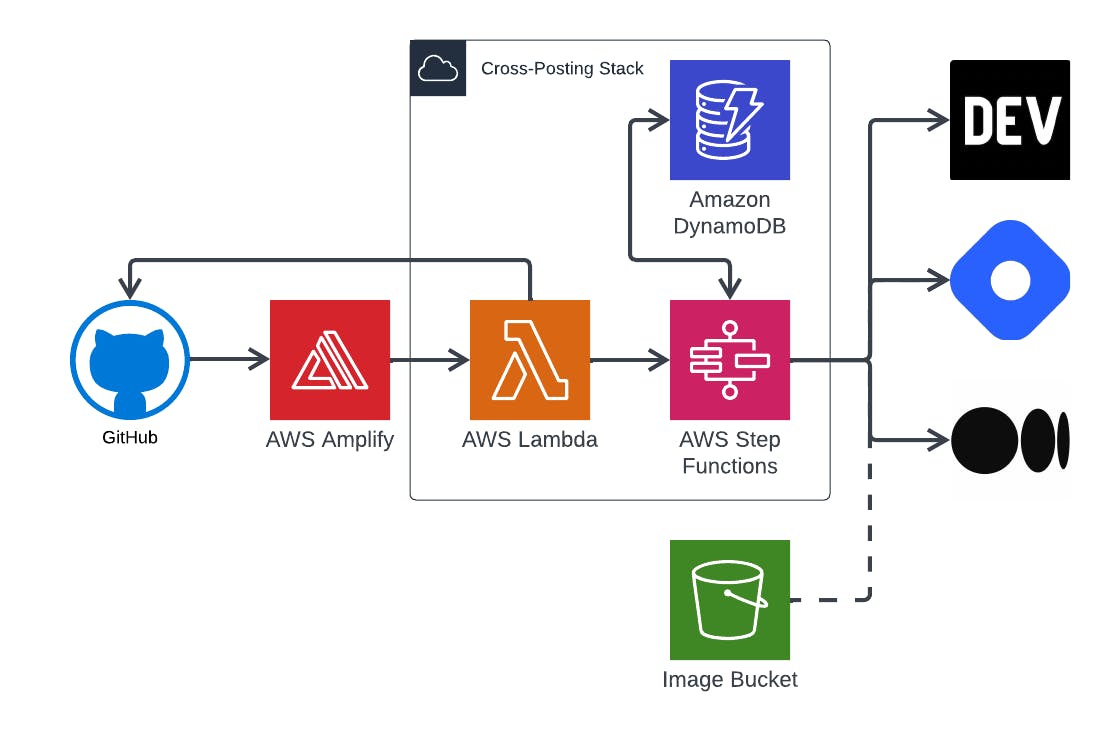
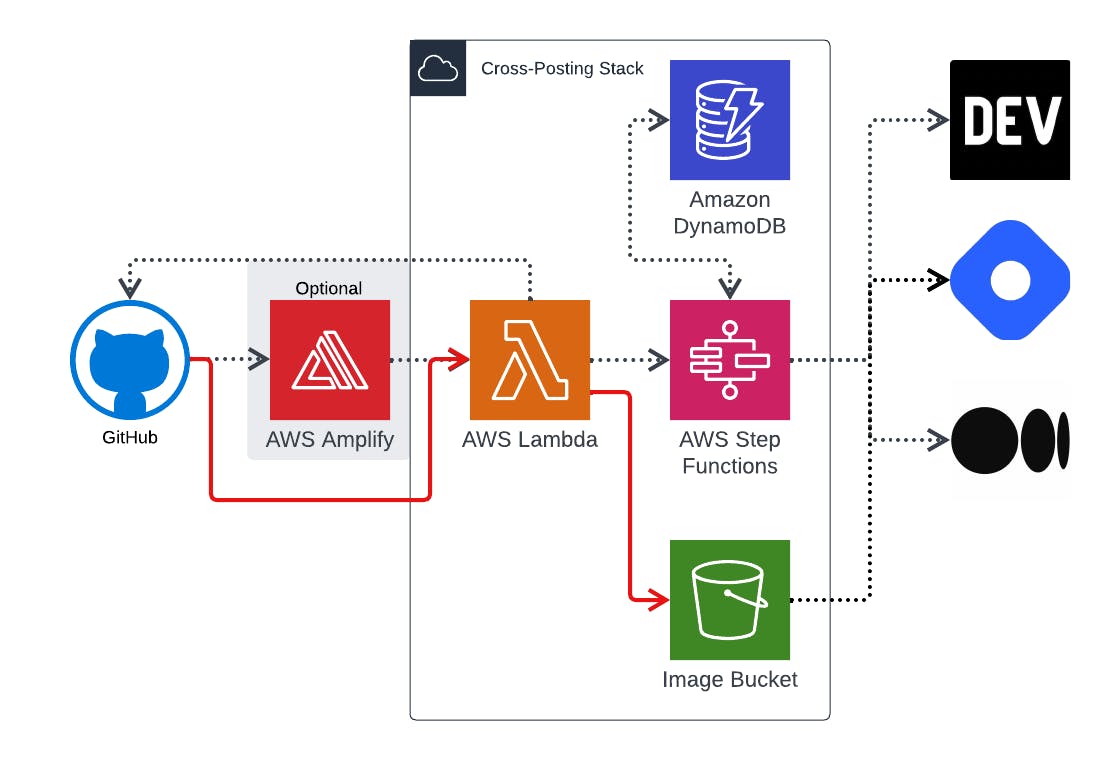
To improve this, we're going to make Amplify optional and add the ability to pull images used in GitHub and re-store them in S3, bringing the S3 bucket into our CloudFormation Stack. 🚀
We can start by creating a Construct for the DynamoDB Table lib/dynamo.ts
export class DynamoDb extends Construct {
  table: Table;
  constructor(scope: Construct, id: string) {
    super(scope, id);
    this.table = new Table(this, `ActivityPubTable`, {
      partitionKey: { name: "pk", type: AttributeType.STRING },
      sortKey: { name: "sk", type: AttributeType.STRING },
      billingMode: BillingMode.PAY_PER_REQUEST,
      timeToLiveAttribute: "ttl",
      removalPolicy: RemovalPolicy.DESTROY,
    });

    this.table.addGlobalSecondaryIndex({
      indexName: "GSI1",
      partitionKey: { name: "GSI1PK", type: AttributeType.STRING },
      sortKey: { name: "GSI1SK", type: AttributeType.STRING },
      projectionType: ProjectionType.ALL,
    });
  }
}
We create the secret via CDK (and then manually put the secrets into it):
const secret = Secret.fromSecretNameV2(
  this,
  `CrosspostSecrets`,
  secretName
);
Allen had a single lambda do the data transformations for the three blog services... I opted to split that up for better traceability. My architecture will end up having somewhere between 3-7 lambdas depending on what options you turned on. The lambdas are only created if you pass in the properties. They're all created the same general way (side note... I also updated Allen's code from javascript to TypeScript #scopecreep):
const lambdaProps: NodejsFunctionProps = {
  architecture: Architecture.ARM_64,
  memorySize: 1024,
  timeout: Duration.minutes(5),
  runtime: Runtime.NODEJS_18_X,
  environment: {
    TABLE_NAME: table.tableName,
    SECRET_ID: secret.secretName,
  },
};

const sendApiRequestFn = new NodejsFunction(this, `SendApiRequestFn`, {
  ...lambdaProps,
  entry: join(__dirname, `../functions/send-api-request.ts`),
});
sendApiRequestFn.addEnvironment("DRY_RUN", dryRun ? "1" : "0");
secret.grantRead(sendApiRequestFn);
Finally, we need to create the Step Function. Step Functions are notoriously hard to code since they use Amazon States Language (ASL) to define all of the steps. I created a separate CrossPostStepFunction construct.
My step function adds the ability to pick which service creates the Canonical URL and it will first post to that service... get the canonical URL and use that in the subsequent services. There's also a lot of logic to remove things from the State Machine if properties weren't configured... which makes this very flexible.
We were able to abstract out the process for posting to a service to a State Machine Fragment. This fragment is a CDK construct that allows us to re-use a lot of the underlying logic used in the parallel paths for posting to the services. When I configured my stack to not send status emails, not use Hugo and have Hashnode be the primary blog post we get a Step Function that looks like this:
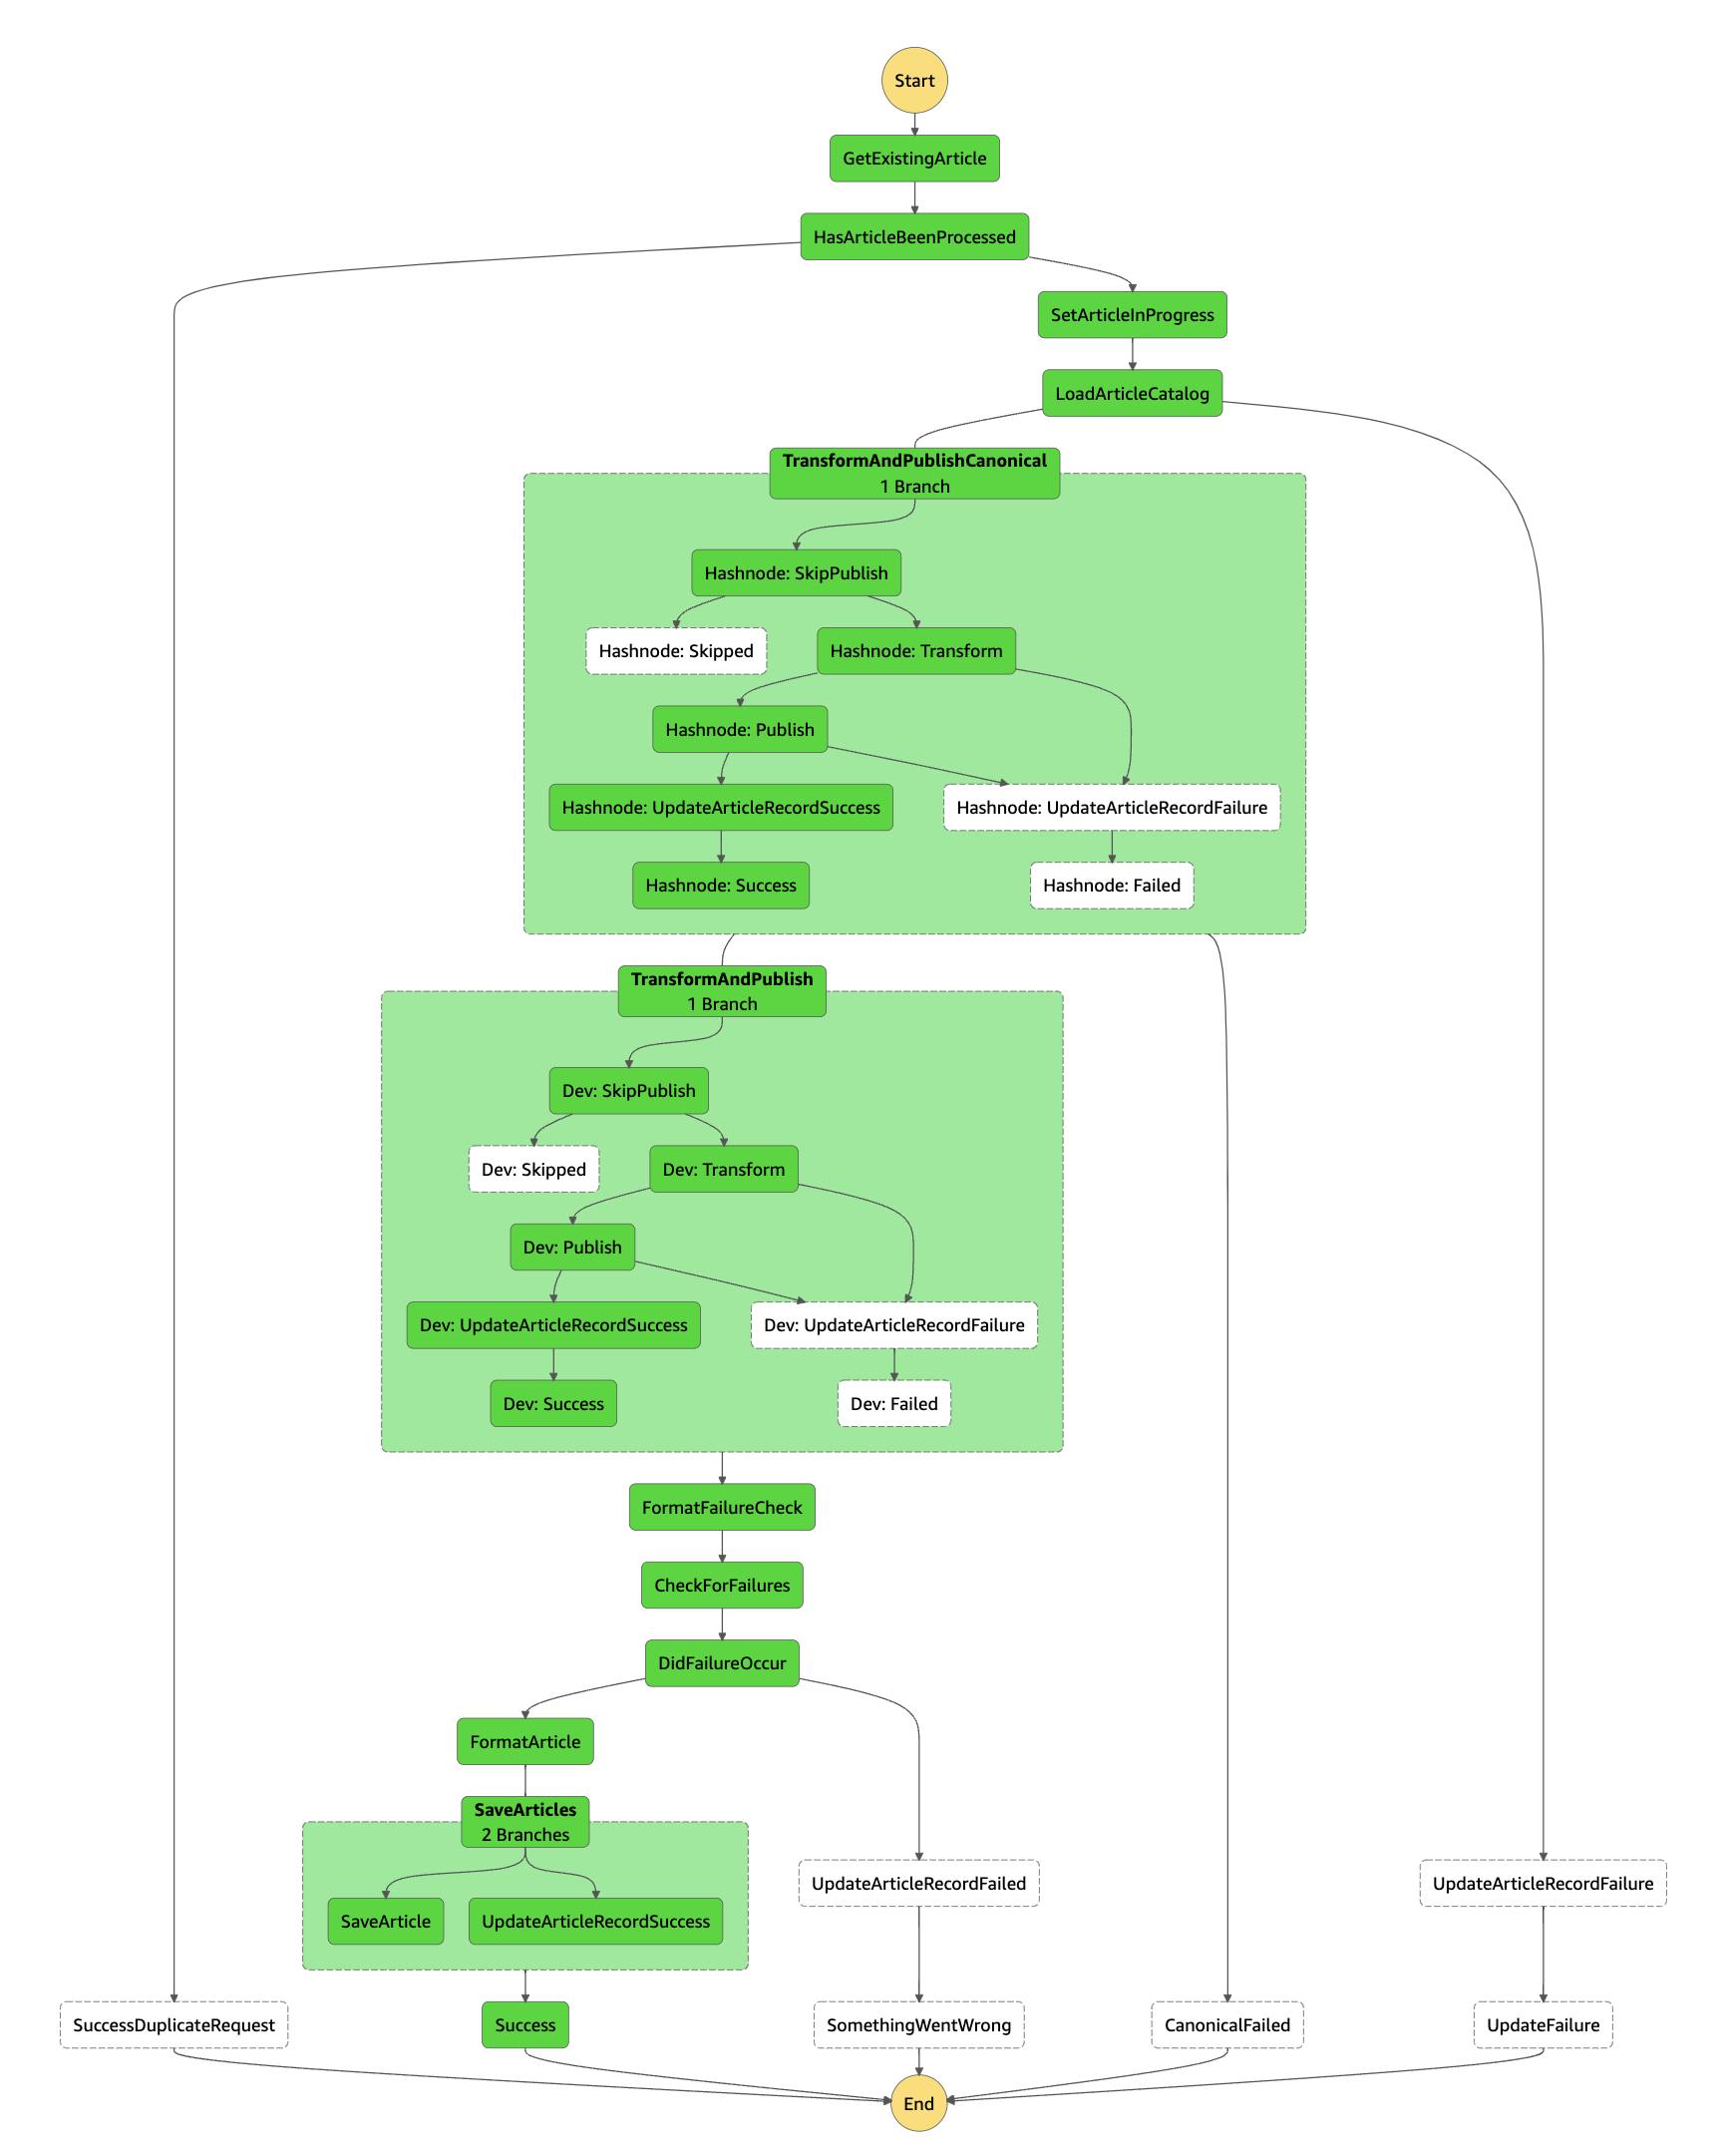
A lot of this is 1:1 with what Allen had in his ASL json file. One interesting fact is that Allen's JSON is 953 lines while my two files of TypeScript code that make up the Step Function ends up being 596 lines (431 + 165)... so almost half while adding a few additional features.
Adding a Direct GitHub Webhook Integration
For our next trick, we will use GitHub Webhook events to trigger our cross-posting, instead of Amplify Events. We can do this by adding a Function URL to the Identify Content Lambda:
const fnUrl = identifyNewContentFn.addFunctionUrl({
  authType: FunctionUrlAuthType.NONE,
  cors: {
    allowedOrigins: ["*"],
  },
});
new CfnOutput(this, `GithubWebhook`, { value: fnUrl.url });
We can then enter this lambda into our GitHub repo's webhook settings so that it will use the webhook for Push events. This enables us to skip some of the identify lambda's code... since the push event happens for every commit and pre-includes the list of files that were added.
export const handler = async (event: any) => {
  try {
    await initializeOctokit();

    let newContent: { fileName: string; commit: string }[] = [];
    if (event.body) {
      const body = JSON.parse(event.body);
      console.log(JSON.stringify({ body }, null, 2));
      if (body.commits) {
        newContent = body.commits.reduce(
          (
            p: { fileName: string; commit: string }[],
            commit: {
              id: string;
              added: string[];
              modified: string[];
              // ... there is more stuff here, but this is all we need
            }
          ) => {
            const addedFiles = commit.added.filter(
              (addedFile: string) =>
                (!blogPathDefined ||
                  addedFile.startsWith(`${process.env.BLOG_PATH}/`)) &&
                addedFile.endsWith(".md")
            );
            return [
              ...p,
              ...addedFiles.map((addedFile) => ({
                fileName: addedFile,
                commit: commit.id,
              })),
            ];
          },
          [] as { fileName: string; commit: string }[]
        );
      } else {
        const recentCommits = await getRecentCommits();
        if (recentCommits.length) {
          newContent = await getNewContent(recentCommits);
        }
      }
    }
    if (newContent.length) {
      const data = await getContentData(newContent);
      const imagesProcessed = await saveImagesToS3(data);
      await processNewContent(imagesProcessed);
    }
  } catch (err) {
    console.error(err);
  }
};
The webhook's event body includes a list of the commits. The Amplify event doesn't have this same list, so we can save some GitHub API calls here. I think this would also be compatible with Allen's code (just in case he wants to switch to that 😈).
Parse and Store Images in S3
But what do we do about images? My overall idea here (for my personal use) was to use a private GitHub repo to store these posts (to avoid SEO shenanigans) and just use relative image linking within the repo for the draft images... that way I could use VS Code's Markdown Preview or Obsidian.md to draft my posts. I asked Allen what he does and was surprised to hear that he hasn't automated this part yet... and as part of his writing he manually uploads images to S3.
So, I got a little creative with some Regular Expressions and parsed out any embedded markdown links... which are formatted with an exclamation point in front of a markdown link (ironically, I can't post an example because my RegExp would incorrectly ingest that 😅)
const contentData: {
fileName: string;
commit: string;
content: string;
sendStatusEmail: boolean;
}[] = [];
const imgRegex = /!\[(.*?)\]\((.*?)\)/g;
for (let j = 0; j < newContent.length; j++) {
const workingContent = { ...newContent[j] };
const imageSet = new Set<string>([]);
let match;
while ((match = imgRegex.exec(newContent[j].content)) !== null) {
imageSet.add(match[2]);
}
const images = [...imageSet];
if (images.length === 0) {
// no images in the post... passthrough
contentData.push(newContent[j]);
continue;
}
const blogFile = newContent[j].fileName;
const blogSplit = `${blogFile}`.split("/");
blogSplit.pop();
const blogBase = blogSplit.join("/");
const s3Mapping: Record<string, string> = {};
for (let k = 0; k < images.length; k++) {
const image = images[k];
const githubPath = join(blogBase, image);
const imageSplit = image.split(".");
const imageExtension = imageSplit[imageSplit.length - 1];
const s3Path = `${blogFile}/${k}.${imageExtension}`.replace(/\ /g, "-");
const s3Url = `https://s3.amazonaws.com/${process.env.MEDIA_BUCKET}/${s3Path}`;
const postContent = await octokit.request(
"GET /repos/{owner}/{repo}/contents/{path}",
{
owner: `${process.env.OWNER}`,
repo: `${process.env.REPO}`,
path: githubPath,
}
);
const buffer = Buffer.from((postContent.data as any).content, "base64");
// upload images to s3
const putImage = new PutObjectCommand({
Bucket: `${process.env.MEDIA_BUCKET}`,
Key: s3Path,
Body: buffer,
});
await s3.send(putImage);
s3Mapping[image] = s3Url;
}
const rewriteLink = (match: string, text: string, url: string) => {
return ``;
}
workingContent.content = workingContent.content.replace(imgRegex, rewriteLink);
contentData.push(workingContent);
}
return contentData;
This code parses out the image links, fetches them from GitHub, uploads them to S3 and replaces the public S3 URLs in the blog post before proceeding. I suppose a requirement here is that the images are required to be in GitHub and if they aren't... things will break. That would be an easy thing for someone to fix/make more flexible 😉
Final Thoughts
That was quite the journey! Although this project took me longer than expected, it was still a lot of fun to work on. I had a tough time trying to limit myself from adding more and more features to it. 😂
After spending some time with it, I'm not entirely convinced that the return on investment is worth it for my specific needs. I only post to two platforms, hashnode and dev.to, it's simple enough for me to copy and paste from one to the other and add the canonical URL to the dev.to metadata. In fact, the two platforms even have an integration that might allow me to skip the copy/paste step entirely. 🤔
But even though I may not use this stack myself, I do hope that it showcases the power and flexibility of creating with CDK. In comparing SAM to CDK... the CDK code clocked in at 907 lines of code (including the Step Function + additional features) while the SAM YAML + ASL JSON came in at 1259 lines of configuration.
This project would have been much quicker to build if I already had a Hugo/Amplify setup or if I hadn't converted everything to TypeScript or added all the other features. 😅
What do you think? Have you ever worked on a project that ended up taking longer than you expected? Did you find it hard to limit yourself from adding more and more features? What do you think about the differences between SAM and CDK here? Let's chat about it! 💬